Showing posts with label Gina K Designs. Show all posts

Tuesday, October 13, 2020

more round boxes

 Hi friends.  Can you tell I like making these little boxes?  I made one for a contest that required a pumpkin.  So... I made the pumpkin... a pumpkin box actually.  

And a better view of the cover.  

I used some silk leaves, which I cut down a bit so they fit better.  I went outside and picked up a few sticks to use as a handle.  They were really dry, so I hope it doesn't break.  But I guess it would be easy enough to replace if it did.  

This next box was a special request by my cousin.  She really liked the floral one I made, so this is pretty similar.  I used a different flower stamp, and the flower on the cover is paper, whereas the other one was silk.  

And here is the cover.  I punched and die cut some different sized flowers, and cut the petal separations deeper.  Then I sponged all the edges with candied apple distress ink.  I turned them over and used a stylus and a thick foam mat to give them more shape and dimension.  Then I glued all the layers together, added some leaves, and glued the flower onto the cover.  

I remembered that I had some decoupage medium (hmmm... actually I have four jars) that would work to give this a nice smooth finish.  Although I didn't check, I'm pretty sure that all the jars have been opened, so hopefully, they are still all usable.  The one I used just needed to be stirred a bit before use.  I normally use matte mod podge, but I only have a little bit left, and I've been procrastinating going shopping for more.  Plus, sometimes it leaves the surface a bit sticky.  I think that may have something to do with the humidity.  I've really been trying to use up what I have instead of buying more.  A while back, I was watching a video, and the girl used a 1:1 mix of water and white glue as a finish.  I absolutely would do that, but I've also used almost all of my white school glue, because I ran out of tacky glue, which is really my favorite for putting this type of project together.  I like it because it's not so runny and dries with less bubbling.  But I found if I use a very thin layer of white glue, that works quite well, too.  

Thank you so much for stopping by to visit.  I always appreciate that. 


Monday, April 18, 2016

the great divide

Hi friends.  I thought I should post something, so you don't feel neglected. 

I worked in a booth at the stamp/scrap expo on Friday and Saturday.  I was demoing some dies, so I was on my feet all day.  It felt good to get home and sit. 

It's finally gotten really warm here... somewhere around 80, which for me is actually too warm.  We had windows and doors open, so there was a bit of breeze blowing in, but the breeze has tapered off now. 

I wanted to enter the StampTV release challenge, so I put together a quick card this evening. 

I used Gina K Design stamps hugs & prayers and stately flowers I.  The designer paper was just some scraps left from demoing.  They were too small to use, but just too nice to toss, so I threw them in my bag and brought them home.  The green strip was more blue-green, but I just added some green ink, so it would match the flower stem better.  The flower and bird were colored with distress inks. 

Thanks so much for stopping by. 

Wednesday, September 16, 2015

birthday cards

Hi friends.  I'm trying to be a bit better at posting more often.  So here are a couple of cards I made for the neighbor kids last week.  They have back to back birthdays.  

The girl turned 9 and loved her princess card.  The image is a Prima mixed media doll stamp.  For the dress, I stamped a lace background stamp in pink, overstamped the dress part of the doll in black and then cut it out.  I added some shadows with a blender pen and ink pad.  I punched the corners with a carefully placed edge punch.   The lace is a Gina K stamp, seamed together, with the seam covered by one of the words, which were printed from my computer.  

This size card fits in a business size envelope.  

The boy turned 12 and this is his first year on the football team.  The shirt is my own pattern.  The numbers are die cut with Block Party alphabet from Sizzix.  

Thanks so much for taking time to visit today. 


Wednesday, February 11, 2015

more calendar art

Hi friends.  Here's another one of the cards we'll be making in tomorrow's class. 

And here's some more of my calendar art for February. 

Thanks so much for stopping by. 

Thursday, February 5, 2015

and more calendar art

Hi friends.  Here are some more days from my calendar art that I did late last night.

Thanks so much for stopping by.

more calendar art

Hi friends.  So far I've been doing well at keeping up each day on the calendar art.  I've also been working backwards on January, filling in the days I missed, since I didn't start until the last week of the month.  Here are the additional days I've done so far. 


Thanks so much for stopping by.
 

Saturday, August 23, 2014

far club challenges part 2

Hi friends.  Here are some more of the cards I did for the SCS fan club challenges this month.   I've scheduled posts for the next two weeks to include all the cards. 

Some Gina K Designs flowers. 
The background on this one was made with several colors of acrylic paint and then the wood stamped over it.  
The glittery parts of this one are punched from some recyled boxes.  The glitter is mixed with clear embossing powder. 

Thanks so much for stopping by.  

Thursday, January 16, 2014

faux washi tape

Hi friends.  Today's technique challenge on SCS was to use tape. 

I like the look of washi tape, but don't have very much.  Since I have no blue, and that's what I wanted to go with my card, I made my own washi tape using scor-tape and a coffee filter.  I filled one side of the filter with the scor-tape.  Then I used several different blue distress stains to color the filter.  After drying it with my heat gun, I cut apart the strips of tape and then stamped some patterns on some of the strips, using ribbon stripes from Gina K Designs.  The one real disadvantage of this faux washi tape is that it is permanent; you can't lift it off and move it like regular washi tape.  The coffee filter is also less transparent than regular washi tape. 

I inked the background (leaf & floral - hero arts) with bashful blue & misted lightly with water before stamping. 

The main image is from don't worry (our daily bread designs).  I used inktense pencils and a water brush to color it. 

Thanks so much for stopping by. 

Friday, November 1, 2013

hope you can cling to day 31

Hi friends.  So here I am with the cards for the last day of challenges for breast cancer awareness on SCS.  There were three new challenges given. 

Challenge thirty-four - I *heart* you.  A heart shaped card or a card that contains hearts. 

I really wanted to make a triple heart easel card, but after about three tries, I gave up and made a simple heart shaped card.  I'm pretty sure that I can make the easel card, but I didn't want to spend any more time on it today.  


I die cut the largest scallop heart (spellbinders) on the fold for the card base.  Then I cut another heart to put on the front, as well as a slightly smaller one from some basic grey designer paper.  

I stamped the butterfly (SU papillon potpourri) on white and pink with black ink and then punched them out with the matching punch.  The sentiment (hero arts) was punched out with a heart punch.   

Challenge thirty-five - group hug.  A card that is simple in nature, but reflects a message from or to a group of people, and allows the patient to send or receive a Group Hug.


I used poppy field (rubbernecker) and stamped with bermuda bay and jet black stazon on white card stock.  The sentiment is hero arts.  I added a layer of bermuda bay card stock and used a white card base.  

For a little added interest, I glued on some narrow strips of bermuda bay card stock and some 1/8" punched circles.  

Challenge thirty-six - I can't believe it's over.  A black and white card, with just a pop of one of the colors listed below - indicating your "team."   These are somehow based on the show Breaking Bad, but since I don't watch tv, I have only a very vague idea of what the show was about. 

1) Green (Team Walt)
2) Purple (Team Marie)
3) Brown (Team Hank)
4) Pink (Team Holly)
5) Blue - (Team Skyler)
6) Yellow - (Team Jesse)

Since blue is my favorite color, that is the one I chose. 

I stamped the bluebonnet from stately flowers I (gina k designs) in tuxedo black memento, and die cut it with labels collection (SU/sizzix).  I also stamped just a partial image to use for the spotlighting technique.  I punched out a circle from the partial image and colored it with copic markers.  The I added a slightly larger circle in black and glued the colored image where it belonged on the black and white image.  I used a black marker to edge the die cut piece and then added faux piercing all around the edge. 

The background is a penny black stamp called circles and lines, which I stamped in black and then layered with black onto the white card base.  

Thanks so much for joining me this month. 

Monday, October 21, 2013

hope you can cling to days 20 and 21

Hi friends.  I was playing a little catch up today, since I didn't do any stamping yesterday.  So here are my latest cards for the breast cancer awareness challenges on SCS. 

Challenge twenty-three -- kindness is showing support.  Create a card using the KISS technique.

I inked hello doily (SU) with elegant eggplant ink, and then I inked the butterfly with sage shadow and kissed (pressed) them together before stamping the butterfly on white card stock.  I repeated the same steps for the second butterfly.  The butterfly bodies are die cut with a memory box die. 

I glued some strips of sage shadow and elegant eggplant on an ivory card base.  The sentiment is from take flight (gina k).  I sponged the edges of the card with eggplant ink and popped up the wings on the butterflies with foam tape. 

Challenge twenty-four -- The King of Rock n Roll.  Create a card inspired in some way by Elvis. 

I went with the song 'blue suede shoes' and used a piece of blue suede paper.  The card base is more mustard and the DP is pink paislee.  The flowers (judith) are stamped with pacific point ink (I had some extras stamped from a few days ago).  I used copic markers to color them.  I punched a bunch of leaves from old olive card stock using a martha stewart punch.  Then I sponged the edges with old olive and added vein lines with a marker.  I punched out some tiny circles from the DP to use as faux brads.  The sentiment is from sincere salutations (SU).  I really love the color combination on this card. 

My third card is for the technique challenge (Inlay Die Cuts) on SCS.   The technique was to cut small strips of pattern paper or card stock and glue them to another piece of paper and then die cut a shape from the new paper you made.  This is a good technique to use up some small scraps of pattern paper. 

I die cut a scalloped circle and then drew around it with a black sharpie.  The flower die is called honeyblossom sprig from memory box.  This was my first time using it, and I really like it.  The sentiment is from friendship blooms (SU). 

Thank you so much for stopping by.  I hope your week is off to a great start. 

Friday, August 30, 2013

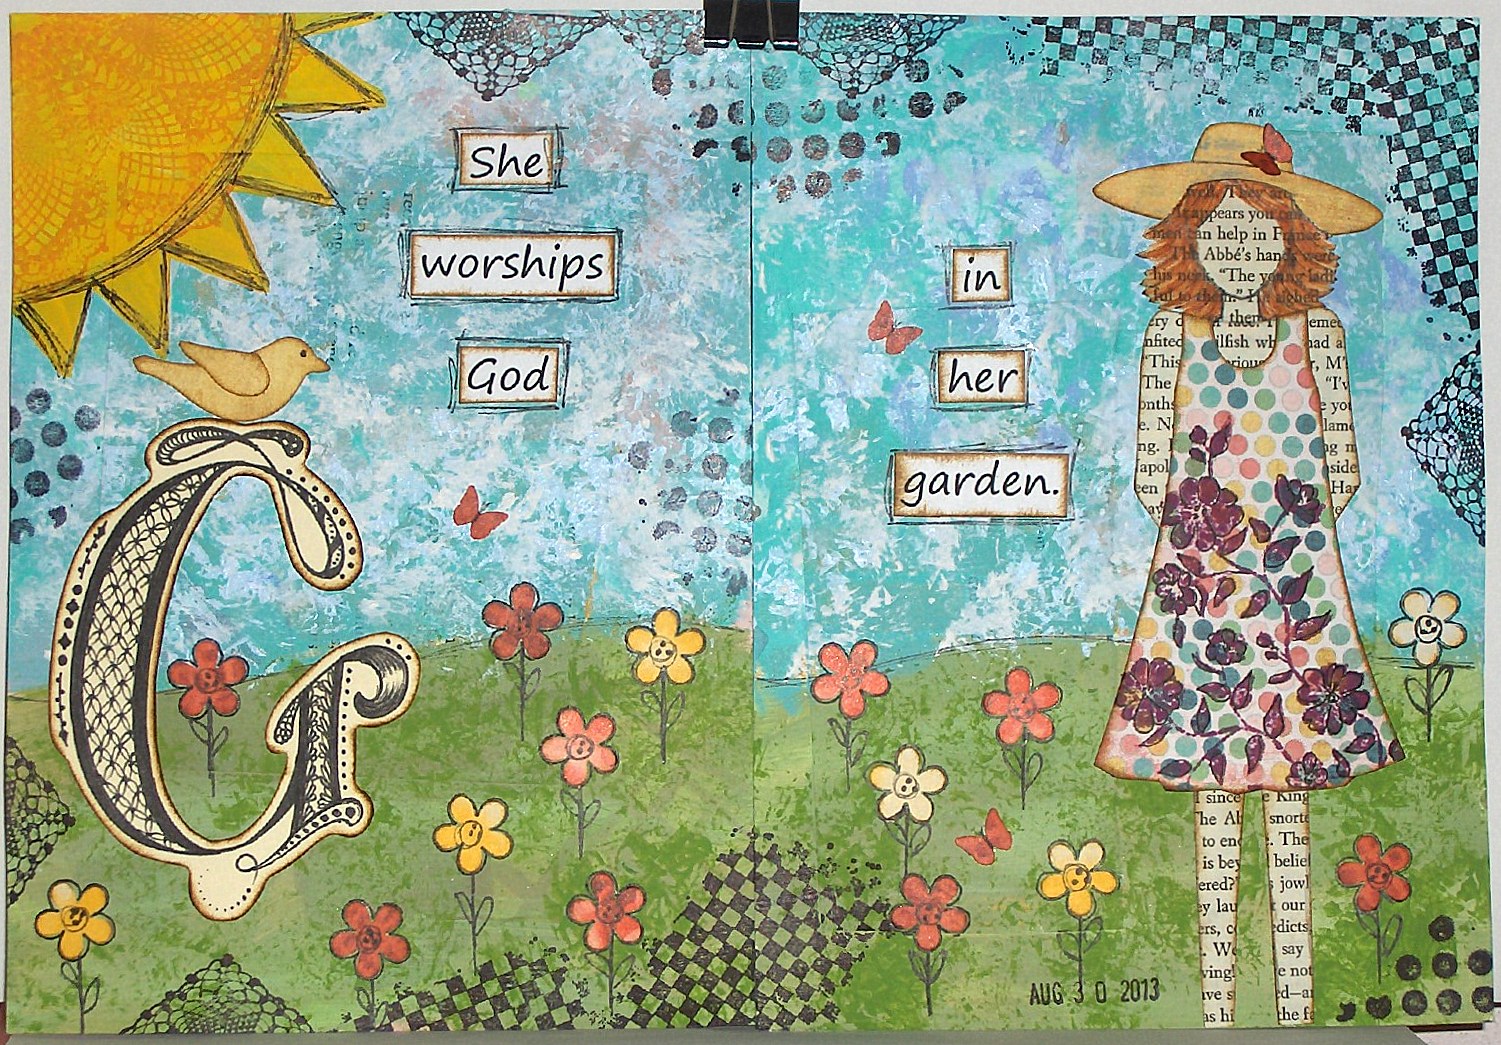
word play - g

Hi my friends.  How about another page spread from my word play journal?  To see all the completed pages, click here.  There's a challenge in the OWSE Yahoo group for the month of August, to create something that refers to what we did this summer.  So, I'm cutting it pretty close to the deadline, which is tomorrow. 

I have what I refer to as my garden.  What it really consists of is four large half-barrels, in which I planted tomatoes.  This is my third year, and what I would consider my first successful one.  The last two years apparently were not good ones for growing tomatoes, because I got very little produce from any of the plants.  But this year I'm happy with how many tomatoes I'm getting.  And the best part -- they are soooo yummy. 

So I made my page spread about a garden.  I have a number of the new Prima mixed media dolls by Julie Nutting, but I didn't think their dressy/flirty style fit with my garden theme, so I decided to try a 'she art' doll.  This is my first attempt, and I'm happy with it.  I used an old book page and designer paper.  The dress is also stamped with flowers.  After cutting out the hat, I cut a slit to fit her head into. 

When I started this journal, I created the base for each page right at the beginning, but for this page, I covered it all up with paint, since it just didn't match my theme. 

To get the texture in the sky, I pounced a stencil brush and gesso over the blue paint. 

The sun is painted, outlined and stamped with a doily stamp.  The flowers are punched and outlined.  The stems and leaves are hand drawn. 

The 'G' is hand drawn and zentangled.  The sentiment is computer generated.   The bird is cut with a Sizzix die and the butterflies are punched with a Martha Stewart punch. Most of the pieces on this spread have been edged with vintage photo distress ink. 

I also did some random stamping with a Gina K. stamp and Tim Holtz stamps. 

Thank you so much for stopping by today.  I hope you have a wonderful weekend. 

Sunday, August 11, 2013

dare to get dirty - page 7

Hi friends.  More cards from the SCS fan club challenges.

The middle one was made for a little neighbor boy who is doing really well in baseball.  His mom said he really loved the card.

Thanks so much for stopping by.

Thursday, March 28, 2013

another dress

Hi friends.  I made another card today using the dress up dies from SU.  The ways to use it challenge on SCS was to use gingham, so I dug in my fabric stash to find a piece.  I don't think it's true woven gingham, just printed, but I figured it would work.  And it was just big enough to die cut one of the dresses from the dress up dies.  I cut the same dress from card stock to put behind the fabric for stability. 

The dress form was cut from a chipboard box and then stamped with wood grain cover-a-card stamp from Impression Obsession using vintage photo distress ink. 

My card base is mustard.  I embossed a piece of white with flourish and dots embossing folder and sponged mustard ink over the raised area.  I added faux stitching around the part that wasn't embossed. 

I added a strip of black card stock at the waist and a flower that is 4 blossoms punched with my Martha Stewart 3 in 1 hydrangea punch, with a black pearl in the center.  

The sentiment is from fanciful tags (Gina K Designs). 

Thanks so much for stopping by today. 

Saturday, March 2, 2013

faux wood

Happy Saturday!  Last night, while I had the house to myself, I was busy stamping.  I made two cards that were very similar, but used different stamps for each. 

One was for a challenge to on Stamp TV for their newest stamp release party.  The challenge is to make a card using faux wood technique. 

The faux wood background is made by dragging your ink pads down the paper until you have the look you want.  I used creamy caramel, more mustard, really rust, and chocolate chip inks.  Then you make board lines and nails with a black marker. 

The image is part of a Gina K set called stately flowers 1.  I stamped the flower with tuxedo black memento ink and colored it with Copic markers.  Then I die cut it with a spellbinders oval, and backed it with a scalloped oval in black. 

The lace piece is from lacy borders (GKD), stamped in ballet blue and trimmed along the image.  I lightly sponged some creamy caramel over it to age it a little. 

The sentiment is from the same flower set. 

The second card is for the inspiration challenge on SCS.  I chose a hedgehog clock as my inspiration. 

Then I pulled out a very old SU stamp set called hedgehog happiness.  I made the card the same way as I did the first one.  The only differences are the sentiment is part of the stamp, and the horizontal strip is made with ribbon stripes (GKD) in wild wasabi ink. 

Thank you so much for stopping by today.  I hope you are enjoying your weekend. 

Saturday, February 23, 2013

20 hearts - #14

Hi friends.  Here I am again with another heart for the February monthly challenge at Motley Soul Mixed-Media Art. This is also for Mix-Ability challenge #3 on SCS, a mixed media challenge to use text and 3 different reds.

My base is cereal box chipboard, covered with recycled coffee filters and coated with gesso.
For the heart, I tore a page from an old book and stamped the flower right on the page with jet black archival ink.  I painted the flower with twinkling H2O's, then added red Derwent Inktense pencil near the center of the flower.  I dipped the point of the pencil in water and then colored.  I love these pencils.  I only have six and most definitely need to get a larger set. 

To add some contrast, I cut a black heart just a little bit larger than the first one, so I could layer it on the black, which really makes the heart stand out. 

To make the frame, I wanted to use washi tape, but I don't have any in red.  I love washi tape, but I think it's way overpriced, so I usually make my own.  I put 1/2" Scor-tape on recycled coffee filters (plain or printed tissue paper also works for this) and then cut the strips apart, cutting close to the edge of the tape.  Then I swiped some barn door distress stain over the strips, let them dry, and stamped the polka dots - a border stamp from Gina K - with jet black archival ink.  To use the faux washi tape, you just peel off the protective backing.  It works and looks just like the real thing, except it's not repositional. 

Then I just positioned the heart and glued it on. 

Thank you so much for stopping in today.  I hope you are enjoying the weekend.  I just looked out the window and we have snow coming down again.  I shoveled most of the drive yesterday.  I think there was about 6". 

Tuesday, February 12, 2013

sanded embossing

Hello friends.  Seems like it's been forever since I've done any of the challenges on Splitcoaststampers.  There was a time I was doing one every day.  But I guess my priorities have changed, as has my art.  I've been dabbling more in mixed media, so I don't make as many cards.  I'm sure the fact that I have a mega supply of cards also has something to do with it. 

However, since I'm still teaching two card classes a month, there is still a need to make a few.  I decided to make one for my class this week using the technique challenge that was posted on Monday.  The challenge was to dry emboss some pattern paper and then sand over the raised areas. 

I chose a piece of paper from My Mind's Eye, embossed it with my textile embossing folder and then sanded with a sanding block.  I mounted that on moss card stock.  I then punched some 7/8" circles from artichoke card stock and cut them in half before attaching them. 

The focal image is from Hugs & Prayers (Gina K.), stamped on naturals ivory with jet black stazon and die cut with a Spellbinders scallop circle.  I used watercolor pencils and a blender pen to color the image.  The edge of the circle is sponged with artichoke ink and dots are added with a black marker. 

Thanks so much for joining me today for a visit. 

Saturday, February 9, 2013

20 hearts - #3, 4 & 5

Hello my friends.  I made some more heart cards for the February monthly challenge at Motley Soul Mixed-Media Art.  It's quite a challenge to come up with 20 hearts that are all different. 

The first one today is a stenciled heart.  First I painted a very pale blue on the background.  I cut the stencil from paper and used a dot stencil over that, to get a dotted heart.  The dots are paint and the heart is distress ink.  Then I used the cut out heart as a mask, so I could stamp the filigree background from SU. 

I used two photo corner punches for the corners and added some white gel pen highlights. 

The sentiment was computer generated. 

My next card has a washi tape heart.  The music strip is from Tim Holtz and the others are hand made with tissue paper, scor-tape, distress stains and stamps.  I just put the strips on white card stock and then ran it through my cuttlbug with a scallop heart die (Spellbinders). 

Some stamped, torn card stock and a computer generated sentiment complete this card. 

My third card has a hand crocheted heart.  The background was painted red and then a Gina K lace border was stamped with white pigment ink.  Even with a heat gun, the white ink took forever to dry.  The heart is not permanently attached to the card.  It's just tied on with ribbon, so the recipient can remove it and use it for something else.  The sentiment is computer generated and punched wih a word window punch and tied to the ribbon. 

Thank you so much for stopping by today.                                                                                                           

Saturday, January 26, 2013

21 cards - #24

Hello again.  Here's another card for the monthly challenge at Motley Soul Mixed-Media Art.  This post shows how I made the base for my cards. 

My inspiration jar words were: rainbow, flowers, and leaves.

Since the coffee filter is somewhat translucent and doesn't completely cover the words on the boxes I used for the base, I painted on a coat of white acrylic paint.  Then I used watercolor crayons and a water brush to make a rainbow background. 

I stamped the flower (which does have a couple of leaves kind of hidden in there) from Local King Rubber Stamps with tuxedo black Memento ink on white card stock and colored it with Copic markers.  Then I cut it out, using a craft knife to cut out the inner portions. 

The lace borders, from Gina K, were stamped with jet black archival ink on white. Then I sponged ruby red ink all over them to match the flowers.  I cut along the scallops. 

I have this sentiment on a stamp from Endless Creations, but it was too big to fit on the card, so I typed it up on the computer and printed it.  I cut apart the words so they would fit bordering alongside the flower. 

Thank you so much for stopping by for a visit. 

Tuesday, January 8, 2013

21 cards - #2

Hello, friends.  It's number 2 of the 21 cards challenge from Motley Soul Mixed-Media Art.

I started this card the same as card #1, described here.  This is the back side of card #1.  I decided to make art on both sides.  I guess that's the frugal part of me at work.  I really hate to waste things. 

For the background, I applied yellow acrylic paint with my fingers.  When that was dry, I used a die cut (Spellbinders Lotus Pendant die) as a stencil and applied orange and red paint with a makeup sponge.  I dragged the red out farther to overlap some of the orange.

I then used stamps from Gina K and Inkadinkado along the edges with jet black archival ink.  There are also some very light circles where I applied ink with the plastic insert from a roll of tape.  It wasn't as effective as I anticipated.  I think paint would have given a bolder circle.

Since I'm really trying to stretch myself, especially with my art, I added the sentiment, 'Be Bold' with a combination of black Sharpie and Copic marker.  I needed the flexible brush tip on the Copic marker to smooth over the background texture. 

This card is very different than what I normally create, so I guess the stretching must be working.

Thanks so much for stopping by.