Hello my friends. It's another card for the monthly challenge at Motley Soul Mixed-Media Art. Even though my title says card #22, this is actually a makeover of card #10. I really didn't like that one, so I covered it completely with gesso and started over.
My daughter wanted to draw words again from my inspiration jar, so the words are: happy, quilt, and background stamps. I think she just wants to see if I'm up to the challenge.
I went for my fabric and found some 2 inch squares, which worked perfectly. I chose blue and brown and attached them to the card with matte Mod Podge.
I cut the house free hand and used a burlap background (Cornish Heritage Farms) with salty ocean distress ink, and a crackle background (Judikins) with jet black archival ink for the roof. Then I sponged vintage photo distress ink over the roof and along the edges of both pieces. The windows and door were cut from navy card stock.
I printed the sentiment on my computer, cut the words apart and edged the pieces with vintage photo.
I used a white gel pen and black Sharpie marker to add quilting stitches on the house and fabric squares.
Since quilts make me happy, I used all three words, and I really love this card.
Thank you so much for spending time here with me today. Have a great weekend.
Showing posts with label Judikins. Show all posts
Friday, January 25, 2013
Saturday, July 28, 2012
balance
Happy Saturday, my friends. We received a few good drenching rain showers this week, so our lawn is looking a little less brown. I heard some lawn mowers out this morning, including ours.
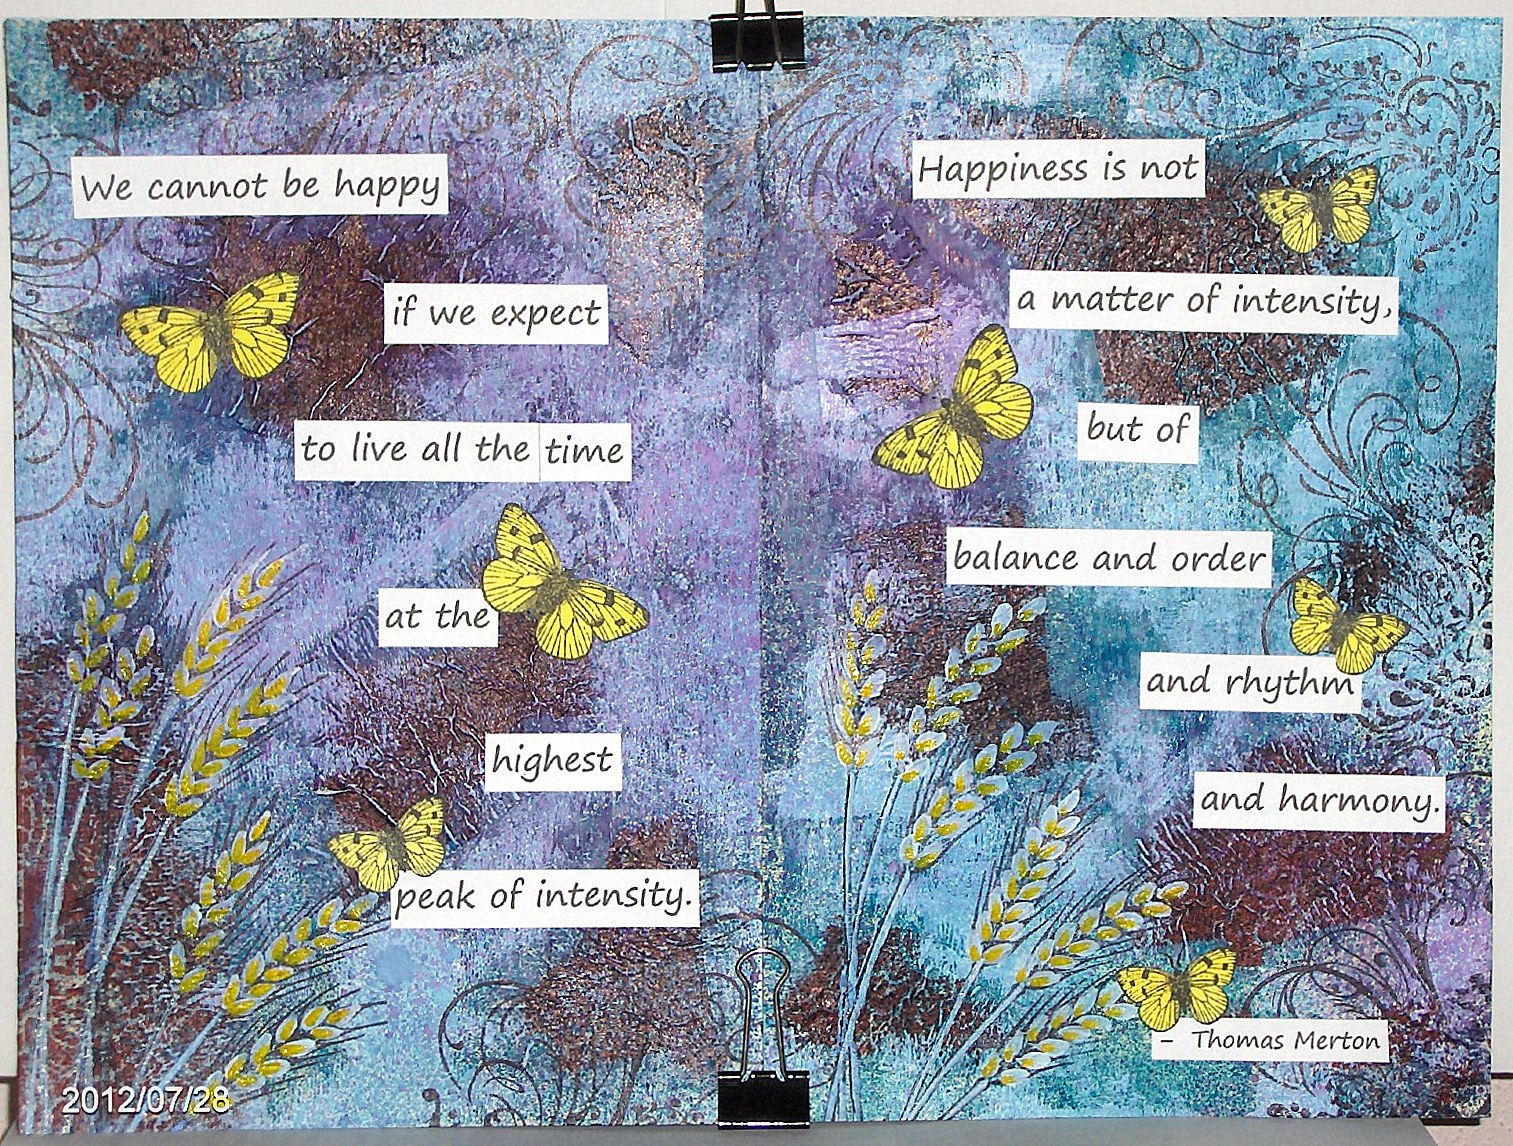
I made another art journal spread for a technique at OWSE Yahoo group. This one is a paper napkin technique. We were supposed to start with a colorful printed napkin, but the only one I could find was a dark rust with a creamy pattern on it. Rather than go out shopping, I decided to use it.
I stamped the napkin with several background type stamps in black archival ink and then tore the napkin into pieces and glued them to my pages with matte Mod Podge. The next step was to paint around the pieces with a neutral color paint; I used off white.
Then I sprayed the pages with ink sprays - blue, turquoise, and purple. To blot the ink, I rolled paper towel over the pages. Then I heat set the ink to dry it.
Once the ink was dry, I lightly brayered white paint on the pages, again leaving the napkin pieces visible. The ink colored my paint, so it's no longer white, making it a lot darker than I had planned.
Again using black archival ink, I stamped some images on the pages - wheat (Judikins) and flourish (Inkadinkado). I wanted more color, so I painted the wheat kernels with gesso and then used a yellow marker to add some color.
I typed up the sentiment on my computer and printed it, cut it apart and attached it to my pages. At this point, I still wanted more color, so I stamped some Hero Art butterflies, colored them with a copic marker and cut them out.
And there you have it. Thanks so much for stopping by. Have a great weekend.
I made another art journal spread for a technique at OWSE Yahoo group. This one is a paper napkin technique. We were supposed to start with a colorful printed napkin, but the only one I could find was a dark rust with a creamy pattern on it. Rather than go out shopping, I decided to use it.
I stamped the napkin with several background type stamps in black archival ink and then tore the napkin into pieces and glued them to my pages with matte Mod Podge. The next step was to paint around the pieces with a neutral color paint; I used off white.
Then I sprayed the pages with ink sprays - blue, turquoise, and purple. To blot the ink, I rolled paper towel over the pages. Then I heat set the ink to dry it.
Once the ink was dry, I lightly brayered white paint on the pages, again leaving the napkin pieces visible. The ink colored my paint, so it's no longer white, making it a lot darker than I had planned.
Again using black archival ink, I stamped some images on the pages - wheat (Judikins) and flourish (Inkadinkado). I wanted more color, so I painted the wheat kernels with gesso and then used a yellow marker to add some color.
I typed up the sentiment on my computer and printed it, cut it apart and attached it to my pages. At this point, I still wanted more color, so I stamped some Hero Art butterflies, colored them with a copic marker and cut them out.
And there you have it. Thanks so much for stopping by. Have a great weekend.
Labels:
acrylic paint,
art journal,
gesso,
Hero Arts,
Inkadinkado,
Judikins,
OWSE,
paint
Friday, April 20, 2012
amber waves of grain
Hello, my friends. It's been awhile since I've blogged. Busy week. Today I have an art journal spread done for a challenge on OWSE Yahoo group. The challenge consisted of brayering a small amount of paint on the page, letting it dry and then adding another color. I actually added a third color, because I didn't like the large amount of white showing.
The wheat stamp (Judikins) is one that I picked up today at a stamp/scrap expo. After stamping it in black archival, I used a mustard marker to fill in the wheat.
I used my computer to print the words from the song. After cutting them apart, I sponged some cool caribbean ink on the edges.
I sponged some blue paint around the edges of the pages.
Thanks so much for stopping by. I hope you're headed for a wonderful weekend.
The wheat stamp (Judikins) is one that I picked up today at a stamp/scrap expo. After stamping it in black archival, I used a mustard marker to fill in the wheat.
I used my computer to print the words from the song. After cutting them apart, I sponged some cool caribbean ink on the edges.
I sponged some blue paint around the edges of the pages.
Thanks so much for stopping by. I hope you're headed for a wonderful weekend.
Labels:
acrylic paint,
art journal,
gesso,
Judikins,
OWSE,
quick fire challenge,
special techniques
Friday, December 23, 2011
Tim tag #10
Hi my friends. I think I might just get them all done. I'm one more tag closer to getting finished. This is my second one today, but by the time I finish typing my post, it will probably be a new date, since it's almost midnight.
Here's the link to Tim's tag #10. And here is my version.
More improvising was required on this tag. I had actually started the first step a couple of days ago - packing tape transfer - but my first one (actually two) have disappeared. I think static is probably the reason. They grabbed onto something and are hiding. But that's OK. I actually like this one way better. I pulled out some old Christmas cards and found a picture that was small enough to use.
Then came time to do some improvising. Although I'm sure all the paper was gone from the tape, the metal foil tape didn't show through at all, so it made no sense to even use it, so I didn't. I also don't have any facets, so instead, I used a piece of plastic packaging on the front of the picture and on the back, I built up a few layers of card stock to give it some stability. I used my cropadile to punch holes in it for the brads.
My music background stamp is from Judikins and the greenery is from Cornish Heritage Farms. After I stamped the green, I heat set it before I put the embossing powder one -- oops! So I pulled out my versamarker and went over all the stems and leaves and then embossed it. You can't even tell the difference.
No banner die here, so I cut that freehand, and added some distress ink to make it blend with the rest of the tag. I stamped the sentiment and cut it apart, because it was in three lines. It was too long to fit the banner, so I just left out the word 'still'.
Then I added some hand cut holly leaves and some punched berries, to which I have added some glossy accents.
I'm so glad you stopped by to visit. I'm not sure I'll be posting again before Christmas, so I hope you have a wonderful time with your dearest friends and family. We have two get togethers this weekend, one with my husband's family and one with mine. Tomorrow I need to do some food preparation.
Here's the link to Tim's tag #10. And here is my version.
More improvising was required on this tag. I had actually started the first step a couple of days ago - packing tape transfer - but my first one (actually two) have disappeared. I think static is probably the reason. They grabbed onto something and are hiding. But that's OK. I actually like this one way better. I pulled out some old Christmas cards and found a picture that was small enough to use.
Then came time to do some improvising. Although I'm sure all the paper was gone from the tape, the metal foil tape didn't show through at all, so it made no sense to even use it, so I didn't. I also don't have any facets, so instead, I used a piece of plastic packaging on the front of the picture and on the back, I built up a few layers of card stock to give it some stability. I used my cropadile to punch holes in it for the brads.
My music background stamp is from Judikins and the greenery is from Cornish Heritage Farms. After I stamped the green, I heat set it before I put the embossing powder one -- oops! So I pulled out my versamarker and went over all the stems and leaves and then embossed it. You can't even tell the difference.
No banner die here, so I cut that freehand, and added some distress ink to make it blend with the rest of the tag. I stamped the sentiment and cut it apart, because it was in three lines. It was too long to fit the banner, so I just left out the word 'still'.
Then I added some hand cut holly leaves and some punched berries, to which I have added some glossy accents.
I'm so glad you stopped by to visit. I'm not sure I'll be posting again before Christmas, so I hope you have a wonderful time with your dearest friends and family. We have two get togethers this weekend, one with my husband's family and one with mine. Tomorrow I need to do some food preparation.
Labels:
Cornish Heritage Farms,
Judikins,
special techniques,
tag,
TH tags 2011,
Tim Holtz
Sunday, May 31, 2009
no energy, but lots of buttons
Hello, everyone. Needless to say, I've been missing. Why, you ask? 'Cause I have I have a nasty head cold that just doesn't want to go away. You know, the kind that makes it hard to breathe through your nose. And along with it, I seem to be zapped of energy. Just don't feel like doing much of anything. And that includes stamping. I do, however, have a card to show you that I made Thursday for the ways to use it challenge on SCS -- yup -- Thursday, and I'm just now posting it. That just shows you how little energy I have. I was going to post on Friday night and couldn't keep awake. Then I actually started a post yesterday, again having trouble keeping my eyes open in the middle of the day... arrrrggh! I had typed a paragraph or two and then it just disappeared. So I gave up. So here it is Sunday morning and I am going to try again.
The challenge was to use buttons. Well, I have buttons, several large jars. Buttons are fun and interesting. Mom always had Velveeta boxes full of buttons (that was when the cheese still came in a nice solid box). I remember playing with her buttons as a child and my children have done the same with mine. I think I've collected buttons forever, from old worn out clothes, from rummages, etc. You never know when you'll need a replacement on some garment and maybe, you just might have a match. When Mom passed away, my oldest sister and I got her buttons. In order to be fair in splitting them up, we dumped them all together -- a huge dishpan full -- and then split them by weight. Fun!
OK, I digress. On to the card. I knew that I wanted to use buttons for a butterfly body. I've seen people use beads, or flat pearls, or glitter, and I th0ught buttons would be fun. So I chose some really rust, groovy guava and blush blossom card stock and went to work. I wanted to use a lot of texture on my card, since I tend to forget that I have all those embossing folders (you know the ones I just had to have).
I started by stamping a music background on the blush blossom. Since I accidentally stamped it a bit crooked, I decided to just tear off the edges and distress it a bit. I have a distressing tool, but a scissor was handy, so I used that. I sponged the edges with chocolate chip.
Next I die cut and embossed two butterflies with my cuttlebug butterfly combo die on groovy guava card stock. I sponged some rust on the embossing to highlight it and chocolate chip around the edges. Then I decided to try a new to me product, bronze glimmer mist, and spritzed it. Impatience made me dry it with my heat gun. It gave a really nice shimmer. I bent up the wings and glued the butterflies together along the center and then added the buttons. I wanted to have thread in the buttons, so I pierced holes to make it easier to sew through the card stock.
I embossed a piece of groovy guava card stock with my CB textile folder, sponged the embossing with rust and the edges with chocolate chip. Then to add a bit of interest, I punched each corner with my Martha Stewart leaf punch.
I sponged the really rust card base along the edges with chocolate chip. And then on all these layers I spritzed with the bronze glimmer mist. Can you tell I like this stuff?
I decided I wanted to use a couple of my crocheted flowers, but wanted something behind them. Last week I bought a clear Hero Arts set of flowers. Since I really prefer wood mounted stamps, I rarely purchase clear ones, but I really like this set and it only comes in clear, so I caved and got it. I stamped one of the flowers twice with chocolate chip on guava, cut them out and sponged the edges and spritzed with the glimmer mist. Ahhh, back to the button jar. I found a couple of brown buttons for the flower centers and sewed the buttons, crochet flower and stamped flowers together.
I was going to use a different sentiment, but it was just too long, so I pulled out an old favorite, stamped in chocolate chip, punched out with my large oval punch, sponged the edges, and backed with a guava scalloped oval punch, also sponged.
Now I was ready to assemble the card. The textured layer was glued to the card base. The music is popped up at an angle. The butterfly, the sentiment and the lowest flower are all popped up.
One last little addition was the flat back pearls along the sentiment piece and in the corners.
What's in it?
stamps: small script (SU), music background (Judikins), flowers (Hero Arts)
ink: basic black, really rust, chocolate chip
paper: really rust, groovy guava, blush blossom
other: cuttlebug, CB textile embossing folder, CB butterfly combo die, buttons, needle, brown thread, crochet flowers, bronze glimmer mist (Tattered Angels), flat back pearls, sponge daubers, large oval and scalloped oval punches, leaf punch (Martha Stewart), foam tape
Thanks so much for stopping by. Until next time, be blessed.
The challenge was to use buttons. Well, I have buttons, several large jars. Buttons are fun and interesting. Mom always had Velveeta boxes full of buttons (that was when the cheese still came in a nice solid box). I remember playing with her buttons as a child and my children have done the same with mine. I think I've collected buttons forever, from old worn out clothes, from rummages, etc. You never know when you'll need a replacement on some garment and maybe, you just might have a match. When Mom passed away, my oldest sister and I got her buttons. In order to be fair in splitting them up, we dumped them all together -- a huge dishpan full -- and then split them by weight. Fun!
OK, I digress. On to the card. I knew that I wanted to use buttons for a butterfly body. I've seen people use beads, or flat pearls, or glitter, and I th0ught buttons would be fun. So I chose some really rust, groovy guava and blush blossom card stock and went to work. I wanted to use a lot of texture on my card, since I tend to forget that I have all those embossing folders (you know the ones I just had to have).
I started by stamping a music background on the blush blossom. Since I accidentally stamped it a bit crooked, I decided to just tear off the edges and distress it a bit. I have a distressing tool, but a scissor was handy, so I used that. I sponged the edges with chocolate chip.Next I die cut and embossed two butterflies with my cuttlebug butterfly combo die on groovy guava card stock. I sponged some rust on the embossing to highlight it and chocolate chip around the edges. Then I decided to try a new to me product, bronze glimmer mist, and spritzed it. Impatience made me dry it with my heat gun. It gave a really nice shimmer. I bent up the wings and glued the butterflies together along the center and then added the buttons. I wanted to have thread in the buttons, so I pierced holes to make it easier to sew through the card stock.
I embossed a piece of groovy guava card stock with my CB textile folder, sponged the embossing with rust and the edges with chocolate chip. Then to add a bit of interest, I punched each corner with my Martha Stewart leaf punch.
I sponged the really rust card base along the edges with chocolate chip. And then on all these layers I spritzed with the bronze glimmer mist. Can you tell I like this stuff?
I decided I wanted to use a couple of my crocheted flowers, but wanted something behind them. Last week I bought a clear Hero Arts set of flowers. Since I really prefer wood mounted stamps, I rarely purchase clear ones, but I really like this set and it only comes in clear, so I caved and got it. I stamped one of the flowers twice with chocolate chip on guava, cut them out and sponged the edges and spritzed with the glimmer mist. Ahhh, back to the button jar. I found a couple of brown buttons for the flower centers and sewed the buttons, crochet flower and stamped flowers together.
I was going to use a different sentiment, but it was just too long, so I pulled out an old favorite, stamped in chocolate chip, punched out with my large oval punch, sponged the edges, and backed with a guava scalloped oval punch, also sponged.
Now I was ready to assemble the card. The textured layer was glued to the card base. The music is popped up at an angle. The butterfly, the sentiment and the lowest flower are all popped up.
One last little addition was the flat back pearls along the sentiment piece and in the corners.
What's in it?
stamps: small script (SU), music background (Judikins), flowers (Hero Arts)
ink: basic black, really rust, chocolate chip
paper: really rust, groovy guava, blush blossom
other: cuttlebug, CB textile embossing folder, CB butterfly combo die, buttons, needle, brown thread, crochet flowers, bronze glimmer mist (Tattered Angels), flat back pearls, sponge daubers, large oval and scalloped oval punches, leaf punch (Martha Stewart), foam tape
Thanks so much for stopping by. Until next time, be blessed.
Labels:
card creations,
crochet,
Hero Arts,
Judikins,
SU
Saturday, April 11, 2009
inspiration challenge
Happy Saturday. Today's card is what I did for the inspiration challenge on SCS this morning. I was a bit rushed with a busy, but I wanted to make a card inspired by this piece.
I managed to get a lot of texture into this one. The left side of the card is creamy caramel stamped with old burlap background, a Judikins stamp that I've had a long, long time. Then I ran the piece through my cuttlebug with the friends forever embossing folder and brayered over the raised parts.
The blue on the right is canvas fabric, which I picked up at Walmart. I also stamped the same background on that and then stamped the Penny Black lace flower in white (which barely shows) and chocolate chip craft inks. I decided to heat set it just in case it wasn't dry. I didn't want to chance smearing the ink. Since I wanted to cut around part of the flower, I painted over the back of the canvas with acrylic paint to stabilize it.
Now, I've probably mentioned at some time in the past that bordering blue is my least favorite color in SU's palette, so I wasn't too happy with this card. It was very bland and I thought it needed a little punch, so I added the ribbon, the jumbo brad, the faux brads down at the bottom and some faux piercing. I'm not sure if you can tell, but I also took my chocolate chip marker and just drew a line around the image piece. I also stamped the card base with the same lace flower.
What's in it?
stamps: beautiful borders (SU), lace flower (Penny Black), old burlap (Judikins)
ink: creamy caramel, close to cocoa, white craft, chocolate chip craft, chocolate chip marker
paper: bordering blue, creamy caramel
other: blue canvas, cuttlebug, cb friends forever embossing folder, jumbo brad (Making Memories), mat pack, white gel pen, brayer, chocolate grosgrain ribbon
Thanks so much for stopping by. Comments are always welcome. Be blessed.
I managed to get a lot of texture into this one. The left side of the card is creamy caramel stamped with old burlap background, a Judikins stamp that I've had a long, long time. Then I ran the piece through my cuttlebug with the friends forever embossing folder and brayered over the raised parts.The blue on the right is canvas fabric, which I picked up at Walmart. I also stamped the same background on that and then stamped the Penny Black lace flower in white (which barely shows) and chocolate chip craft inks. I decided to heat set it just in case it wasn't dry. I didn't want to chance smearing the ink. Since I wanted to cut around part of the flower, I painted over the back of the canvas with acrylic paint to stabilize it.
Now, I've probably mentioned at some time in the past that bordering blue is my least favorite color in SU's palette, so I wasn't too happy with this card. It was very bland and I thought it needed a little punch, so I added the ribbon, the jumbo brad, the faux brads down at the bottom and some faux piercing. I'm not sure if you can tell, but I also took my chocolate chip marker and just drew a line around the image piece. I also stamped the card base with the same lace flower.
What's in it?
stamps: beautiful borders (SU), lace flower (Penny Black), old burlap (Judikins)
ink: creamy caramel, close to cocoa, white craft, chocolate chip craft, chocolate chip marker
paper: bordering blue, creamy caramel
other: blue canvas, cuttlebug, cb friends forever embossing folder, jumbo brad (Making Memories), mat pack, white gel pen, brayer, chocolate grosgrain ribbon
Thanks so much for stopping by. Comments are always welcome. Be blessed.

Labels:
card creations,
fabric,
Judikins,
Penny Black,
SU
Saturday, December 13, 2008
christmas card
I finally finished putting together our Christmas cards for this year. Ended up taking a lot longer than I had anticipated. But, I'm happy with how they turned out. I made about 60 with a couple of mavericks in there (you know the ones that you test something and it's not quite what you want, but still usable).
I started by stamping the music background in navy on ivory card stock. I wanted it to look old, so I stamped a part of sanded background, added a coffee stain, lots of speckles and sponged the edges. Then I added snowflakes in bashful blue. I used 5 different snowflake stamps, some stamped more than once. OK, background is done. Now for the rest.
The angel is stamped in night of navy craft ink and clear embossed. Then I embossed the saying on vellum. Did you know that because vellum is non-porous, you can use classic ink for embossing if you work quickly? I thought this would give me a cleaner image, so I pulled out a color I don't use much (so saffron), and since the gold embossing powder is opaque, any color under it doesn't show. I only wanted to use part of the stamp, so I took a piece of masking tape and stuck it on my clothes a few times to remove some of the stickiness and then put it over the part of the stamp I didn't want, inked the stamp, removed the tape and stamped. That's a lot easier than trying to just ink the part you want without getting any ink on the rest. Then the vellum was just wrapped around the ivory card stock and glued on back. The glittery snowflake is a Martha Stewart punch put through my xyron sticker maker and then smooshed in glitter and attached with a brad.
I wanted the back layer dark, but didn't want to add another layer, so I made a cheater layer. I just took my navy marker brush tip and ran the side of it along the edges of my card base - instant layer. It didn't even have to be real neat, since only 1/8" was going to show.
what's in it?
stamps: Christ is born, snow swirled, sanded (SU), music background (Judikins), coffee stain, angel (Inkadinkadoo), snowflakes (Cornish Heritage farms)
ink: night of navy (classic & craft), chocolate chip, bashful blue, close to cocoa, so saffron
paper: Wausau Exact Index ivory, vellum
other: Martha Stewart snowflake punch, Art Institute glitter, antiqu gold brad, clear and gold embossing powder
Thanks so much for stopping by today. Be blessed.
I started by stamping the music background in navy on ivory card stock. I wanted it to look old, so I stamped a part of sanded background, added a coffee stain, lots of speckles and sponged the edges. Then I added snowflakes in bashful blue. I used 5 different snowflake stamps, some stamped more than once. OK, background is done. Now for the rest.The angel is stamped in night of navy craft ink and clear embossed. Then I embossed the saying on vellum. Did you know that because vellum is non-porous, you can use classic ink for embossing if you work quickly? I thought this would give me a cleaner image, so I pulled out a color I don't use much (so saffron), and since the gold embossing powder is opaque, any color under it doesn't show. I only wanted to use part of the stamp, so I took a piece of masking tape and stuck it on my clothes a few times to remove some of the stickiness and then put it over the part of the stamp I didn't want, inked the stamp, removed the tape and stamped. That's a lot easier than trying to just ink the part you want without getting any ink on the rest. Then the vellum was just wrapped around the ivory card stock and glued on back. The glittery snowflake is a Martha Stewart punch put through my xyron sticker maker and then smooshed in glitter and attached with a brad.
I wanted the back layer dark, but didn't want to add another layer, so I made a cheater layer. I just took my navy marker brush tip and ran the side of it along the edges of my card base - instant layer. It didn't even have to be real neat, since only 1/8" was going to show.what's in it?
stamps: Christ is born, snow swirled, sanded (SU), music background (Judikins), coffee stain, angel (Inkadinkadoo), snowflakes (Cornish Heritage farms)
ink: night of navy (classic & craft), chocolate chip, bashful blue, close to cocoa, so saffron
paper: Wausau Exact Index ivory, vellum
other: Martha Stewart snowflake punch, Art Institute glitter, antiqu gold brad, clear and gold embossing powder
Thanks so much for stopping by today. Be blessed.
Labels:
card creations,
christmas,
Cornish Heritage Farms,
Inkadinkado,
Judikins
Subscribe to:
Posts (Atom)