Showing posts with label Judith. Show all posts

Monday, February 9, 2015

calendar art

Hi friends.  Here are a few more little pieces of art for February. 

Thanks so much for stopping by. 

Thursday, February 5, 2015

and more calendar art

Hi friends.  Here are some more days from my calendar art that I did late last night.

Thanks so much for stopping by.

Saturday, January 31, 2015

January 31st... really?

Hi friends.  How time does fly!  I'm not sure what I was thinking, but I was sure that tomorrow was the end of the month.  I guess that means I need to do at least 2 every day on my calendar art for awhile.  I need to catch up!

And just to show you how mixed up I am on my days, I have two from yesterday that I didn't post yet.

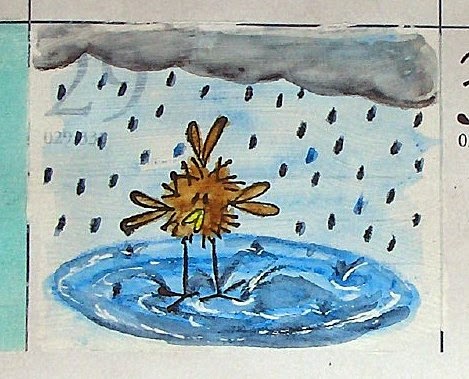
The mixability challenge on SCS called for raindrops.  I used a little dorky bird from Judith.  And the free for all challenge called for teeny art.  Natural beauty's little bird to the rescue.  

I made one late last night and another this morning.  The first one was just a quick draw - for sure nothing fancy.  My drawing skills have never been enhanced by any education. 

For the second one, I wanted to use my favorite retired SU stamp set.  The one problem I've always had with this set is that the single flower and butterfly have some sketch lines on them that I don't like, so I typically would cut these images out.

I really didn't want to have to do that on my calendar, so I decided to do some long-needed surgery.  I took my exacto knife and cut off the lines!

I love them now.  I don't know why I didn't do that years ago.

So with a bit of masking, I used both the flower and butterfly, and then colored them with inktense pencils and a water brush.

I also drew in a few leaves.

I'm having so much fun with these tiny little spaces.  It usually doesn't take much time to finish one, so I haven't spent all day on it, but have still managed to get in a little creativity time.

Thanks so much for stopping by.  


Friday, August 29, 2014

fan club challenges part 8

Hi friends.  Here are more from the dare to get dirty challenges on SCS. 

Lots of dots. 

I used one of my big crochet flowers on this one. 

Some paper quilting. 

Thanks so much for stopping by. 

Monday, October 21, 2013

hope you can cling to days 20 and 21

Hi friends.  I was playing a little catch up today, since I didn't do any stamping yesterday.  So here are my latest cards for the breast cancer awareness challenges on SCS. 

Challenge twenty-three -- kindness is showing support.  Create a card using the KISS technique.

I inked hello doily (SU) with elegant eggplant ink, and then I inked the butterfly with sage shadow and kissed (pressed) them together before stamping the butterfly on white card stock.  I repeated the same steps for the second butterfly.  The butterfly bodies are die cut with a memory box die. 

I glued some strips of sage shadow and elegant eggplant on an ivory card base.  The sentiment is from take flight (gina k).  I sponged the edges of the card with eggplant ink and popped up the wings on the butterflies with foam tape. 

Challenge twenty-four -- The King of Rock n Roll.  Create a card inspired in some way by Elvis. 

I went with the song 'blue suede shoes' and used a piece of blue suede paper.  The card base is more mustard and the DP is pink paislee.  The flowers (judith) are stamped with pacific point ink (I had some extras stamped from a few days ago).  I used copic markers to color them.  I punched a bunch of leaves from old olive card stock using a martha stewart punch.  Then I sponged the edges with old olive and added vein lines with a marker.  I punched out some tiny circles from the DP to use as faux brads.  The sentiment is from sincere salutations (SU).  I really love the color combination on this card. 

My third card is for the technique challenge (Inlay Die Cuts) on SCS.   The technique was to cut small strips of pattern paper or card stock and glue them to another piece of paper and then die cut a shape from the new paper you made.  This is a good technique to use up some small scraps of pattern paper. 

I die cut a scalloped circle and then drew around it with a black sharpie.  The flower die is called honeyblossom sprig from memory box.  This was my first time using it, and I really like it.  The sentiment is from friendship blooms (SU). 

Thank you so much for stopping by.  I hope your week is off to a great start. 

Wednesday, October 16, 2013

hope you can cling to days 12 and 13

Hi friends.  I have some more cards for the breast cancer awareness challenges on SCS.  Click here for more information on these challenges. 

Challenge fourteen - The Colors of October.  A card using green, yellow, and pink.

I recently acquired a couple of stamps from Memory Box - dogwood branch and dogwood bloom.  They were perfect for this card.

I stamped the branch three times, doing my best to make it look like they are attached as one image.  On another piece of card stock, I also stamped the single bloom three times as well.  I colored the images with copic markers.  I fussy cut the single flowers, but when I cut out the branches, I left a small amount of white around them, and then glued them on certainly celery, with another layer of black, on a white card base.  The sentiment is from Stampendous.

Challenge fifteen - sticking by your side.  A card with a background made from washi tape.

I started with a light blue card base cut to make a peekaboo card (instructions found here).  Then I covered the card front with some Tim Holtz tissue tape.   I stamped some flowers by Judith several times with pacific point ink.  I used a blender pen to add more color to the flowers before cutting them out.  Then I sponged the same ink along the edges of the flowers.  I love how vibrant they look with some of the white still showing.  I stacked two large flowers and one small flower for each bloom. 

I used elegant flourishes die, which I cut apart and rearranged the pieces.  I also added a lot of punched leaves (Martha Stewart).  The sentiment was computer generated, since I didn't have a stamp that fit right in the small circle opening. 

The fun part about this card is when you open it, what is showing in the opening changes.  I apologize for the blurry photo.  My camera battery was dying & wouldn't focus properly. 

Thanks so much for stopping by. 

Wednesday, August 14, 2013

dare to get dirty - page 10

Here are a few more cards I made for the fan club challenges on SCS.  There were 42 challenges, and I made a separate card for each one, so I still have a bunch to show you.


Thanks so much for taking time to stop by. 

Saturday, August 10, 2013

dare to get dirty - page 6

Hello friends.  Here are a few more cards from the SCS fan club challenges.


Thanks so much for stopping by. 

Tuesday, January 8, 2013

21 cards - #3

Hi my friends.  Wow - two posts in one day.  It's been awhile since I've done that.  I'm having so much fun with this challenge from Motley Soul Mixed-Media Art, that I want to keep playing.  I think one reason I like this challenge is that the 4"x6" card is a nice size to work with.  I mostly make cards, so this is a similar size and not too intimidating. 

Please refer to this post to see how I started the cards. 

For this one, the background was made by placing a line of cream acrylic paint along the top edge and dragging the paint down the page with an old gift card.  I repeated the process with a mint green going the other direction.  While the green was still a bit wet, I sprinkled on some water and then pressed a paper towel into it.  Where the paint was wet from the water, the color lifted off.  It's a little hard to see the result, because there isn't much contrast between the two colors, but it was a fun technique that I found on a video here.  I'm sure I'll use it again.  You can see some of the texture from the coffee filter. 

I stamped the Hero Arts butterfly with tuxedo black memento ink on some white card stock and colored it with Copic markers and cut it out. 

The flowers (Judith Stamps) were stamped on white card stock with jet black archival ink.  I colored the centers with yellow marker and then cut the flowers out.  The orange and red were added with a sponge dauber. 

For the leaves, I traced around a hand drawn pattern and then cut them out with deckle scissors.  I sponged the edges with artichoke ink and added vein lines with a black marker.  For placement of the flowers, I almost always glue the flowers down before adding the leaves, but only put glue in the centers, so that I can still tuck the leaves underneath.  If the leaves are a little too long to slip underneath, I simply snip off the inner end, since it isn't going to show anyway. 

When I cut out butterflies, I rarely cut around the antennae.  I just cut them off.  Since I wanted antennae on my butterfly, after gluing the it down, I drew the antennae with a black marker.  The faux stitching along the edges of the card was also done with a black marker. 

The sentiment is computer generated. 

Thanks for stopping by.  


Wednesday, June 20, 2012

guest artist on OWSE

Hello, my friends.  Today, I'm excited to share with you that I am a guest artist on the OWSE blog, Crafting with OWSE.

I would love for you to go and check out my tutorial for making a torn fabric background for my art journal spread.

Thanks so much for stopping by.  Have a blessed day.

Tuesday, May 8, 2012

praise the Lord

Good morning, friends.  I have to say that I'm really enjoying making art journal pages.  I know that from what I've seen on other blogs that my pages are rather unique.  I tend to not like the real busy, messy look.  I really want my focal images to stand out from the background.  I'm just not comfortable with a paint brush in my hand, although this venture has pushed me to make some attempts.  Also, with no formal art training, my attempts at blending colors with anything liquid usually end up muddy, and I've found a wonderful friend in a bottle of gesso.  So, with all that being said, I find that I've simply adapted my own style to my pages -- usually a background of some sort done with a technique that may or may not use paint, stencils (definitely need more of those), ink, doodling, etc. -- and then using stamped images (colored, cut out, and glued) -- and a sentiment that I've printed from my computer. 

I love the ability to experiment with new techniques, so that is one of the things that really motivated me to try art journaling. 

My page today started with a technique given at our last OWSE Yahoo group art journal meeting.  After putting gesso on our page, we brushed a light layer of acrylic paint on and let it dry.  Next, we spread another light layer of paint with a credit card and let it dry.  Third, we added a third color with a baby wipe, at the same time scrubbing some of the previous paint off.  From there, we did whatever we wanted to finish the page.  Since all three of the colors I used were pretty light, you really can't see the results that I achieved underneath the stenciling, but it was pretty cool.  I used a new stencil (thanks, Robyn) with some distress inks (Ranger - mustard seed, barn door, peeled paint & faded jeans) and white kraft ink (SU).  I heat set the inks to make sure they were all completely dry.  I found it interesting that the kraft ink dried with a semigloss finish on top of the paint, instead of the matte finish I normally would see. 

The flowers are stamped with a new Judith stamp I picked up at a local scrapbooking convention in April.  There were two sizes and I bought them both, although I only used the larger one here.  I colored them with copic markers and then added some colored pencil highlights.  (I'm not sure why my camera always seems to wash out my copic coloring - these are a lot more vibrant IRL.)  One of the things that I like with this stamp is it's easy to cut out - not a lot of intricate cutting. 

For the stems, I sketched lightly with a green colored pencil and then PAINTED in the stems -- very carefully!  Yup, I pushed myself!  Once the paint was dry, I added some colored pencil highlights and shadows. 

I cut the leaves freehand with deckle scissors, folded them in half and ran them through my crimper.  Then I highlighted the ridges and edges with a darker green ink and a sponge dauber. 

The butterfly is SU (flores suaves), colored with copic markers and highlighted with white gel pen. 

The verse, Psalm 117:1 is printed from my computer.  This is my May entry to the Divine Design Bible Verse Challenge 2012 on SCS. 

Thank you so much for visiting my blog today.  Be blessed.