Hi friends. It seems as though the past year has just flown by at high speed. Or maybe I'm just slowing down. Whatever the reason, I don't seem to get as much accomplished as I would like.
Although I haven't been employed for some time, at the beginning of December, I officially became a retiree. So I now get to enjoy the benefits of social security and a pension.
I don't make resolutions, because I have the greatest tendency to completely forget about them, and thus, they become no more than a worthless thought. I do, however, have good intentions.
Last night the Outlaw Women had a party - over the internet. No being out on the road with drivers who shouldn't be behind the wheel. We had lots of challenges, prizes, laughter, and whatever party food we wished, all from the comforts of home. What fun.
One of the challenges was to make a card gift box. I chose to make mine from recycled cereal box chipboard. I have a pattern that I made many years ago, so I used that. It makes a nice sturdy box that will hold 8-10 cards with envelopes for a nice gift.
After cutting out the top and bottom, scoring and taping up the sides, I covered it with some pattern paper from Indian Summer stack (I think I got that at JoAnn's). I use PVA glue.
Then I stamped a couple of flowers and colored them with Copic markers, punched out a bunch of leaves, sponged the edges, and arranged them on the top of the box.
My box was randomly drawn as a prize winner - yay!
We also had a scavenger hunt type challenge, where we were given a list of items that must be included on our project. And we only had an hour to complete it.
I made a card using naturals ivory as my base. I stamped an alphabet (collage stuff) repeatedly, using wisteria chalk ink. Then I added to different pattern papers - one with stripes and one with dots - from K&Company (a Christmas gift). I stamped a flourish (inkadinkado) on the dotted one and then added a piece of lace from my stash.
For the main image, I stamped the little butterfly girl (lost coast designs) and just sponged on some of the wisteria ink. I placed a stencil (TCW) over the image and sponged all around the little girl. I then die cut the image with labels collection framelits (SU/Sizzix) and sponged the edges with vintage photo ink. I added glitter on the wings, and then adhered the panel with dimensional foam tape.
After I uploaded my card to the gallery, I found out that I had missed a couple of requirements, when rushing to get them all written down. I guess I got disqualified.
And I just have to show you one of the things my daughter gave me for Christmas. She sewed it completely by hand. I'm so proud of her.
The flowers were sewn individually and stuffed before they were attached to the background. This view shows that better.
She has more plushies for sale in her Etsy store, AdorkableDoodles.
Thanks so much for stopping by. I wish you many blessings in the year ahead. Happy New Year.
Showing posts with label OWSE. Show all posts
Wednesday, January 1, 2014
happy new year 2014
Labels:
3-D items,
box,
Copic Markers,
cuttlebug,
Inkadinkado,
mixed media,
OWSE,
recycle/reuse,
Sizzix
Sunday, November 3, 2013
play in the puddles
Hi friends. I made a super fast card today for the OWSE challenge on facebook, which is to do a project that is weather related.
I looked through some of my paper stash and came upon this wonderful piece with raindrops and umbrellas. Perfect. I simply layered a piece on a white card base, added a sentiment (darcie's) stamped on white card stock and added some faux stitching.
It took me longer to find the stamp than to put the card together.
Thanks for stopping by.
I looked through some of my paper stash and came upon this wonderful piece with raindrops and umbrellas. Perfect. I simply layered a piece on a white card base, added a sentiment (darcie's) stamped on white card stock and added some faux stitching.
It took me longer to find the stamp than to put the card together.
Thanks for stopping by.
Thursday, September 5, 2013
autumn
Hi friends. I've seen a lot of faces all around blogland lately. I've wanted to learn how to make them, or more precisely, paint them. So I've been watching videos and have joined some groups, hoping to learn. Drawing a face isn't really the issue. My problem is putting a brush in my hand and figuring out how to blend paint to get the right shadows and highlights. So far, the main medium I've used is watercolor crayons and pencils. I really want to learn how to use acrylic paints for this.
So I've begun... made a face... but then got stuck on the background. So, I made another face... and got stuck on the background. So, I made another, and another... (you get the picture). Robyn (OWSE Yahoo group) has been pushing me to get one finished. So I finally did! Yay! This one is done on 11"x15" watercolor paper.
Of course, if you know me at all, you know that I rarely take the typical/normal route. I guess I'm one of those who takes the road less traveled.
Robyn has a challenge this week in the OWSE facebook group to make something for fall. So I made my background from die cut leaves and pattern papers. I stamped on some of them and edged them all with vintage photo distress ink. I trimmed some so they look like they are actually behind her, and left some in front.
I also put a few in her hair with a button embellishment.
I hope you like her as much as I do.
So I've begun... made a face... but then got stuck on the background. So, I made another face... and got stuck on the background. So, I made another, and another... (you get the picture). Robyn (OWSE Yahoo group) has been pushing me to get one finished. So I finally did! Yay! This one is done on 11"x15" watercolor paper.
Of course, if you know me at all, you know that I rarely take the typical/normal route. I guess I'm one of those who takes the road less traveled.
Robyn has a challenge this week in the OWSE facebook group to make something for fall. So I made my background from die cut leaves and pattern papers. I stamped on some of them and edged them all with vintage photo distress ink. I trimmed some so they look like they are actually behind her, and left some in front.
I also put a few in her hair with a button embellishment.
I hope you like her as much as I do.
Labels:
acrylic paint,
faces,
mixed media,
OWSE,
paint,
Sizzix,
SU
Friday, August 30, 2013
word play - g
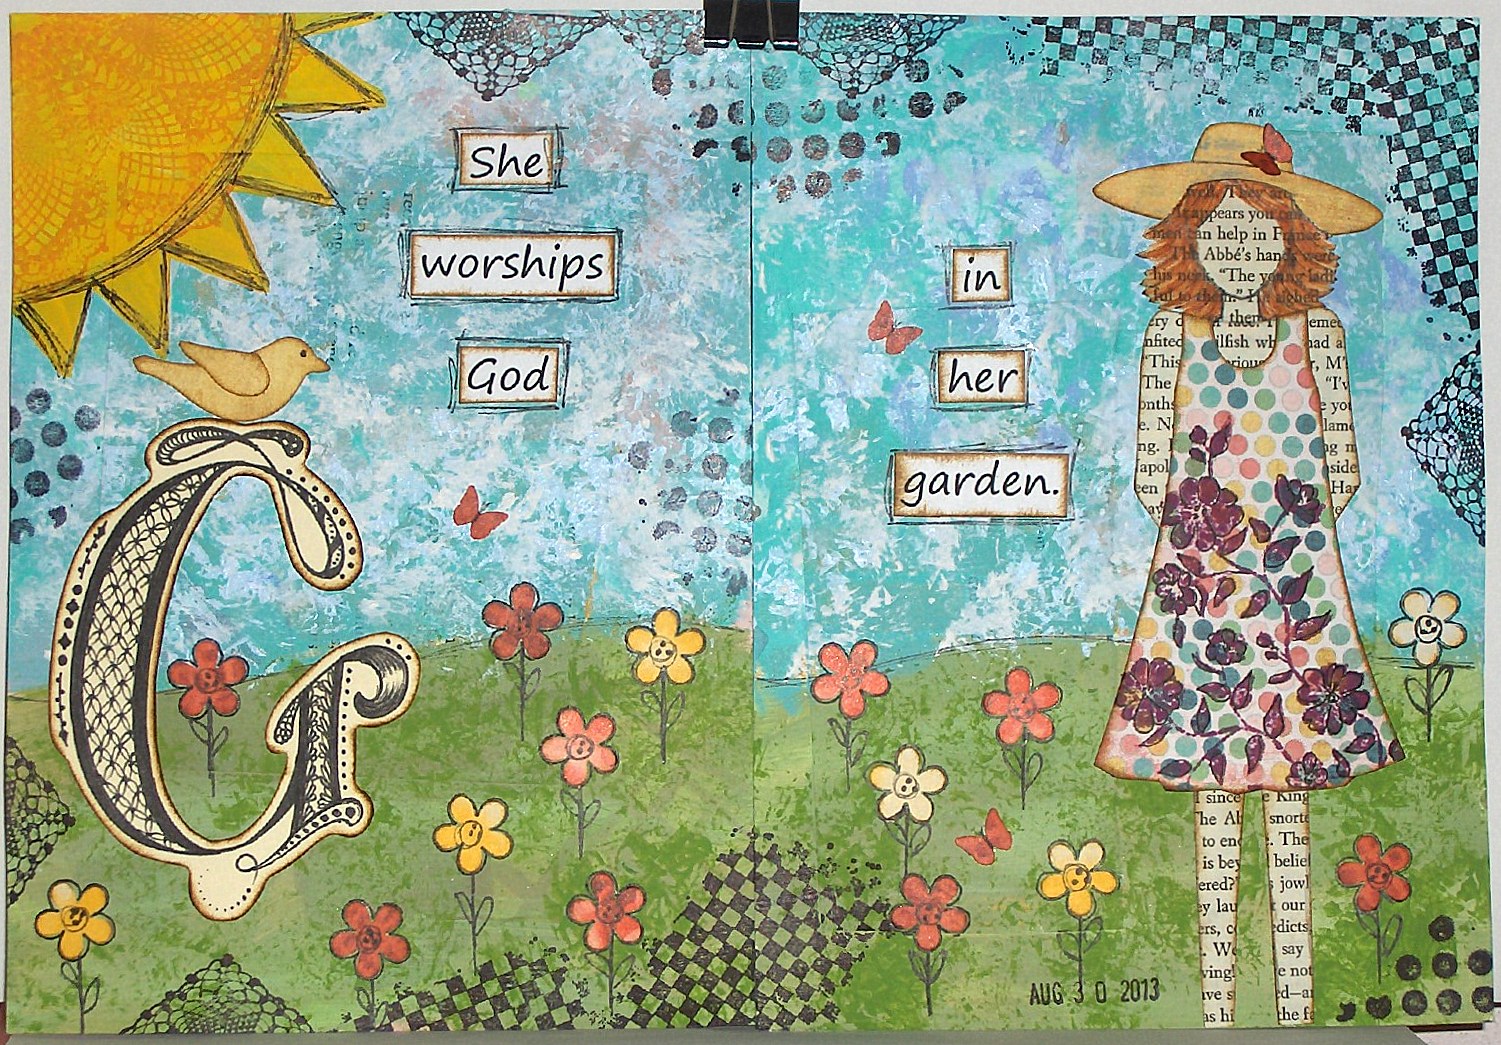
Hi my friends. How about another page spread from my word play journal? To see all the completed pages, click here. There's a challenge in the OWSE Yahoo group for the month of August, to create something that refers to what we did this summer. So, I'm cutting it pretty close to the deadline, which is tomorrow.
I have what I refer to as my garden. What it really consists of is four large half-barrels, in which I planted tomatoes. This is my third year, and what I would consider my first successful one. The last two years apparently were not good ones for growing tomatoes, because I got very little produce from any of the plants. But this year I'm happy with how many tomatoes I'm getting. And the best part -- they are soooo yummy.
So I made my page spread about a garden. I have a number of the new Prima mixed media dolls by Julie Nutting, but I didn't think their dressy/flirty style fit with my garden theme, so I decided to try a 'she art' doll. This is my first attempt, and I'm happy with it. I used an old book page and designer paper. The dress is also stamped with flowers. After cutting out the hat, I cut a slit to fit her head into.
When I started this journal, I created the base for each page right at the beginning, but for this page, I covered it all up with paint, since it just didn't match my theme.
To get the texture in the sky, I pounced a stencil brush and gesso over the blue paint.
The sun is painted, outlined and stamped with a doily stamp. The flowers are punched and outlined. The stems and leaves are hand drawn.
The 'G' is hand drawn and zentangled. The sentiment is computer generated. The bird is cut with a Sizzix die and the butterflies are punched with a Martha Stewart punch. Most of the pieces on this spread have been edged with vintage photo distress ink.
I also did some random stamping with a Gina K. stamp and Tim Holtz stamps.
Thank you so much for stopping by today. I hope you have a wonderful weekend.
I have what I refer to as my garden. What it really consists of is four large half-barrels, in which I planted tomatoes. This is my third year, and what I would consider my first successful one. The last two years apparently were not good ones for growing tomatoes, because I got very little produce from any of the plants. But this year I'm happy with how many tomatoes I'm getting. And the best part -- they are soooo yummy.
So I made my page spread about a garden. I have a number of the new Prima mixed media dolls by Julie Nutting, but I didn't think their dressy/flirty style fit with my garden theme, so I decided to try a 'she art' doll. This is my first attempt, and I'm happy with it. I used an old book page and designer paper. The dress is also stamped with flowers. After cutting out the hat, I cut a slit to fit her head into.
When I started this journal, I created the base for each page right at the beginning, but for this page, I covered it all up with paint, since it just didn't match my theme.
To get the texture in the sky, I pounced a stencil brush and gesso over the blue paint.
The sun is painted, outlined and stamped with a doily stamp. The flowers are punched and outlined. The stems and leaves are hand drawn.
The 'G' is hand drawn and zentangled. The sentiment is computer generated. The bird is cut with a Sizzix die and the butterflies are punched with a Martha Stewart punch. Most of the pieces on this spread have been edged with vintage photo distress ink.
I also did some random stamping with a Gina K. stamp and Tim Holtz stamps.
Thank you so much for stopping by today. I hope you have a wonderful weekend.
Labels:
acrylic paint,
art journal,
cuttlebug,
gesso,
Gina K Designs,
mixed media,
OWSE,
Sizzix,
Tim Holtz,
word play
Saturday, August 24, 2013
word play - F
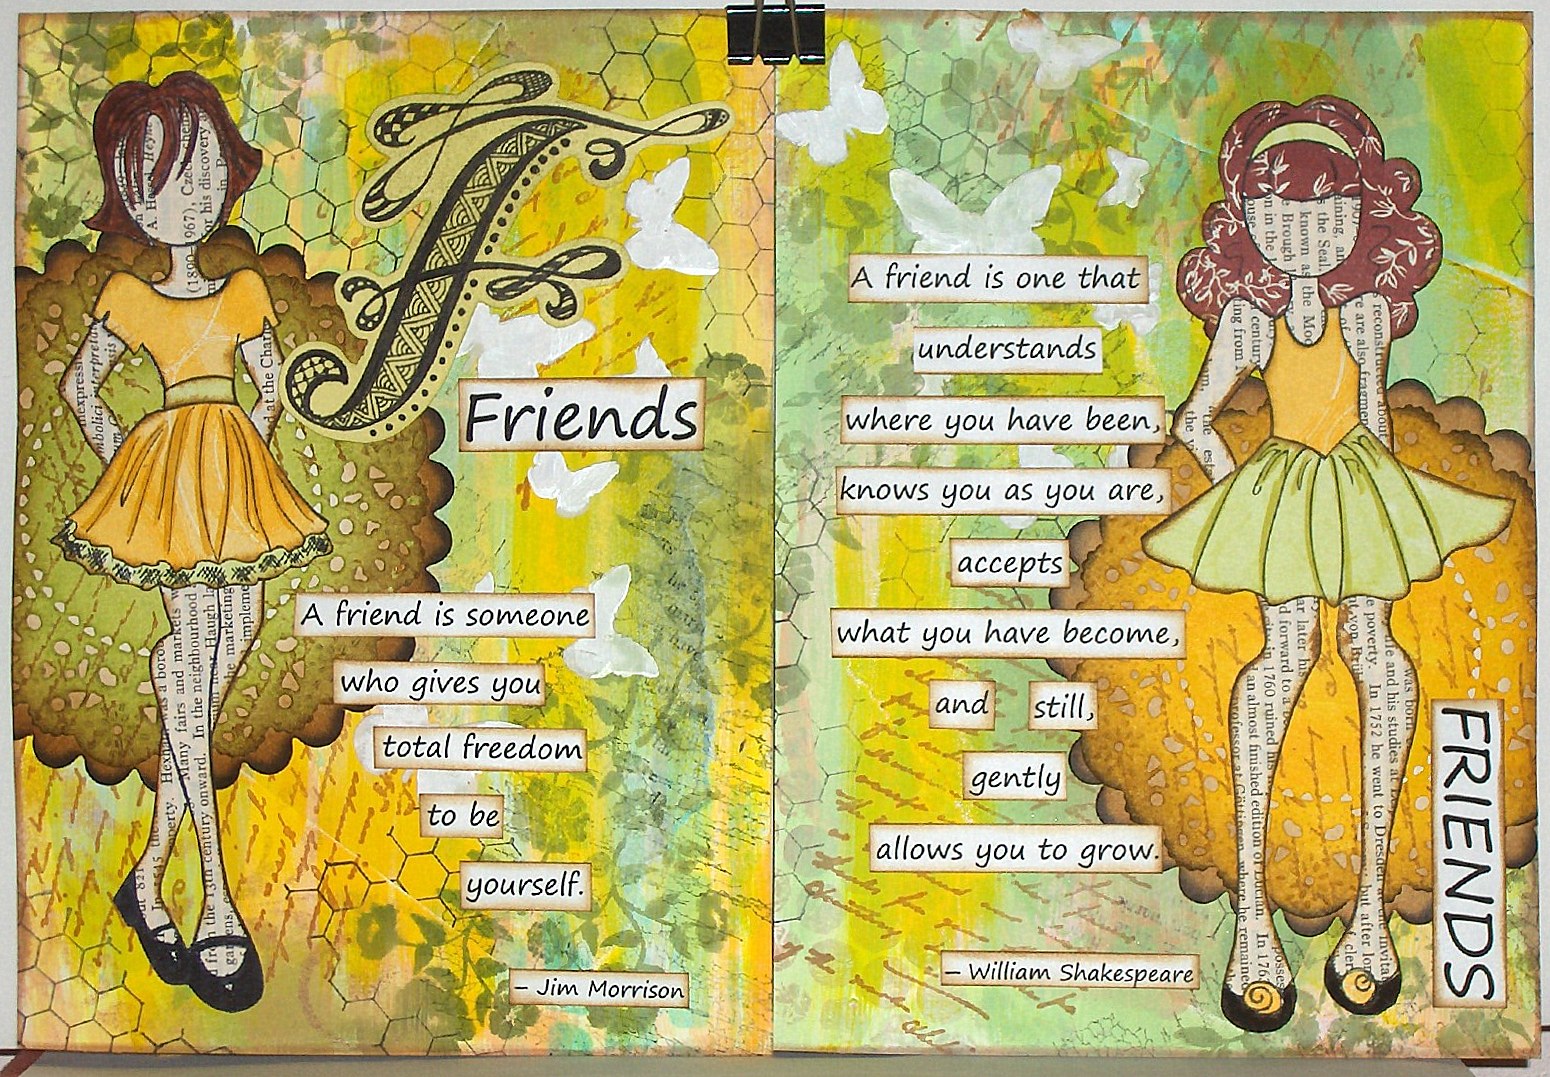
Hi friends. Another spread in my word play journal. I told my daughter that this was my 'F' word, and she just snickered. But no bad language here. My word for the letter F is friends. You can find all the completed pages here.
I wanted to make something for the weekly challenge on the OWSE facebook page, I decided to to make another spread for this journal. There were some choices for colors, and I chose green and yellow. This is really not one of my favorite color combinations, but I guess I need to step out of my box once in awhile.
Although the background of the pages was done previously, I added more color with both paint and ink. Then I did a bunch of stamping and added some texture with modeling paste and a butterfly stencil (Red Lead). In a couple of places, the ink underneath bled through the modeling paste, so I went over that with white acrylic paint. It didn't completely cover, but I thought it wasn't too noticeable, since the background is pretty busy anyway, and I was going to cover up a lot of it with the dolls and the words.
I used two of my new Prima mixed media dolls by Julie Nutting. I have a hard time remembering the names. I first glued a page from an old encyclopedia onto a piece of this card stock and then stamped the dolls on that and cut them out. I paper pieced the clothes and the hair on one.
Behind the dolls are die cuts of a French pastry doily die (Cheery Lynn Designs) and a Sizzix scalloped circle.
The words were printed on my computer and cut out. The edges on everything are sponged with vintage photo distress ink. The letter F is done with zentangles or zendoodles, whichever you want to call it.
Thanks so much for stopping by.
I wanted to make something for the weekly challenge on the OWSE facebook page, I decided to to make another spread for this journal. There were some choices for colors, and I chose green and yellow. This is really not one of my favorite color combinations, but I guess I need to step out of my box once in awhile.
Although the background of the pages was done previously, I added more color with both paint and ink. Then I did a bunch of stamping and added some texture with modeling paste and a butterfly stencil (Red Lead). In a couple of places, the ink underneath bled through the modeling paste, so I went over that with white acrylic paint. It didn't completely cover, but I thought it wasn't too noticeable, since the background is pretty busy anyway, and I was going to cover up a lot of it with the dolls and the words.
I used two of my new Prima mixed media dolls by Julie Nutting. I have a hard time remembering the names. I first glued a page from an old encyclopedia onto a piece of this card stock and then stamped the dolls on that and cut them out. I paper pieced the clothes and the hair on one.
Behind the dolls are die cuts of a French pastry doily die (Cheery Lynn Designs) and a Sizzix scalloped circle.
The words were printed on my computer and cut out. The edges on everything are sponged with vintage photo distress ink. The letter F is done with zentangles or zendoodles, whichever you want to call it.
Thanks so much for stopping by.
Labels:
acrylic paint,
art journal,
Cheery Lynn Designs,
cuttlebug,
gesso,
OWSE,
paint,
paper dolls,
paper piecing,
Prima,
Sizzix,
stencil,
word play,
zentangle
Saturday, July 20, 2013
save the last dance
Hi friends. Tonight, Robyn posted a challenge on our facebook group page to post a completed project. I had been coloring a couple of the Prima mixed media dolls with derwent inktense pencils, so I put together a quick journal page.
I started with a layer of gesso, then used some distress paints by putting them on my craft sheet, spritzing with water and dragging the page through them. After drying them, I added some dylusions spray inks using a stencil made from a sizzix die and a butterfly stencil from red lead.
I used a couple of old SU music sets to stamp randomly with jet black archival ink.
The girl is made using two mixed media dolls (swing dress & doll with strapless dress). I cut the skirt portion from one and added it to the other, so her dress was longer. I cut around the bottom of the bow and tucked the longer skirt underneath. I needed to trim the sides of the original skirt, so that it didn't extend beyond the edges of the new skirt.
The sentiment was typed up on my computer and printed.
Thanks so much for visiting today.
I started with a layer of gesso, then used some distress paints by putting them on my craft sheet, spritzing with water and dragging the page through them. After drying them, I added some dylusions spray inks using a stencil made from a sizzix die and a butterfly stencil from red lead.
I used a couple of old SU music sets to stamp randomly with jet black archival ink.
The girl is made using two mixed media dolls (swing dress & doll with strapless dress). I cut the skirt portion from one and added it to the other, so her dress was longer. I cut around the bottom of the bow and tucked the longer skirt underneath. I needed to trim the sides of the original skirt, so that it didn't extend beyond the edges of the new skirt.
The sentiment was typed up on my computer and printed.
Thanks so much for visiting today.
Labels:
art journal,
distress paint,
mixed media,
OWSE,
paint,
Sizzix,
stencil,
SU,
Tim Holtz
Friday, June 14, 2013
moonflowers
Hello friends. A couple of days ago, a challenge was issued in one of the facebook groups that I'm in. The challenge was to create something inspired by the following quote: "When the earth smelled of summer and the sky was filled with night..."
I wanted to find out where the quote was from, so I did a google search and came up with the following:
Hello Young Lovers (from the King and I)
Anna,
when I think of Tom
I
think about a night
When
the earth smelled of summer
And
the sky was streaked with white
And
the soft mist of England
Was
sleeping on a hill
I
remember this
And
I always will
There
are new lovers now on the same silent hill
Looking
on the same blue sea
And
I know Tom and I are a part of them all
And
they're all a part of Tom and me
Hello
young lovers, whoever you are
I
hope your troubles are few
All
my good wishes go with you tonight
I've
been in love like you
Be
brave young lovers and follow your star
Be
brave and faithful and true
Cling
very close to each other tonight
I've
been in love like you
I
know how it feels to have wings on your heels
And
to fly down the street in a trance
You
fly down a street on a chance that you'll meet
And
you meet – not really by chance
Don't
cry young lovers, whatever you do
Don't
cry because I'm alone
All
of my memories are happy tonight
I've
had a love of my own
I've
had a love of my own like yours
I've
had a love of my own
The line was unintentionally misquoted, but it worked anyway for a great challenge. The first thing that came to mind was moonflowers. Although I've never actually seen a moonflower, I knew that I could find images online. My flowers don't look exactly like moonflowers, but since this is art, it doesn't matter.
It has been a long time since I've done an art journal page, so I pulled out a journal page that I had done the background on months ago and decided to use it.
I added some leaves with green acrylic paint using one of the stencils that I made recently.
Then I stamped some flowers from a SU set called Secret Garden. I sponged the centers with light green ink and added some dots of white acrylic paint with a toothpick that I cut the point off of. I glued on the flowers and added the sentiment, which I printed on the computer.
Thanks so much for stopping by.
Labels:
acrylic paint,
art journal,
gesso,
mixed media,
OWSE,
recycle/reuse,
SU
Tuesday, June 11, 2013
my first canvas ever
Hello friends. This week I've been busy creating cards for my class on Thursday. Once I finished, I decided to play a little bit. There's a challenge to make something with the technique (masking on collage) that was presented last week at our OWSE Art Techniques Club meeting, so I made a canvas, my first ever. It's 14"x11", much larger than anything I normally create. Nothing like stepping out of my little box. I'm glad I did it though. It wasn't nearly as intimidating as I thought it would be, and was rather fun to work on a much larger space.
I started by forming a collage with a bunch of different pattern papers. Then I used a Sizzix butterfly die to make two masks from some recycled chipboard boxes.
Then came paint, removing some of the paint to allow some of the papers to show through, spray inks and stencils, modeling paste with a stencil, and some stamping.
Then I removed the masks. I stamped some buttons from a SU set called button, button. I punched them out, pierced the holes and used a Pitt pen to draw on thread. I used the buttons for the butterfly bodies.
I printed the sentiment on my computer, cut it apart, and added some ink before gluing the words to the canvas.
I don't think it's fabulous, but neither do I dislike it. I would prefer that the butterflies were a single paper and that they stood out more, but since they were part of the technique, I really couldn't change them for the challenge.
Creating on a canvas was definitely a learning experience for me, and I know I'll be doing more of these.
Thank you so much for stopping by.
I started by forming a collage with a bunch of different pattern papers. Then I used a Sizzix butterfly die to make two masks from some recycled chipboard boxes.
Then came paint, removing some of the paint to allow some of the papers to show through, spray inks and stencils, modeling paste with a stencil, and some stamping.
Then I removed the masks. I stamped some buttons from a SU set called button, button. I punched them out, pierced the holes and used a Pitt pen to draw on thread. I used the buttons for the butterfly bodies.
I printed the sentiment on my computer, cut it apart, and added some ink before gluing the words to the canvas.
I don't think it's fabulous, but neither do I dislike it. I would prefer that the butterflies were a single paper and that they stood out more, but since they were part of the technique, I really couldn't change them for the challenge.
Creating on a canvas was definitely a learning experience for me, and I know I'll be doing more of these.
Thank you so much for stopping by.
Labels:
acrylic paint,
canvas,
cuttlebug,
faux buttons,
gesso,
mixed media,
OWSE,
paint,
Sizzix,
special techniques,
stencil,
SU
Tuesday, May 21, 2013
distress paint background
Hi friends. My second post today. I have another card for another challenge for Outlaw Women Artists Emporium group on facebook. This challenge is to use orange and blue.
I started by putting some distress paint on my craft mat - salty ocean, rusty hinge, and seedless preserves. After spritzing the paint with water, I swiped my card stock in the paint and dried it. I glued it to a black card base.
Then I used salty ocean to color some card stock and die cut some mini butterflies. I stamped one with a Donna Salazar script stamp. I layered them together with dimensional foam tape underneath the wings of the top butterfly.
I made two orange chevron strips to fit across the lower portion of the card.
The sentiment is from SU's Refuge & Strength, punched with a scallop oval punch and sponged with salty ocean.
Then I added some faux brads with a black marker.
Thanks for stopping by.
I started by putting some distress paint on my craft mat - salty ocean, rusty hinge, and seedless preserves. After spritzing the paint with water, I swiped my card stock in the paint and dried it. I glued it to a black card base.
Then I used salty ocean to color some card stock and die cut some mini butterflies. I stamped one with a Donna Salazar script stamp. I layered them together with dimensional foam tape underneath the wings of the top butterfly.
I made two orange chevron strips to fit across the lower portion of the card.
The sentiment is from SU's Refuge & Strength, punched with a scallop oval punch and sponged with salty ocean.
Then I added some faux brads with a black marker.
Thanks for stopping by.
girl in pink
Hi friends. Today I made a card for the monthly challenge at OWSE Yahoo group - Little Girls and their Curls. The challenge was to use a little girl on your project. So I pulled out an old SU stamp set called Summer by the Sea.
I stamped the little girl with tuxedo black memento ink on white, and colored the image with copic markers. Although I don't often use pink, this image just seemed to be calling for it. Layering is pretty in pink, black, and some Basic Grey paper.
The sentiment is from Teeny Tiny Wishes (SU), punched with a word window punch and backed with a modern label punch. Both pieces were edged with black marker.
The image and sentiment are both raised on dimensional foam tape.
Thanks so much for stopping by today.
I stamped the little girl with tuxedo black memento ink on white, and colored the image with copic markers. Although I don't often use pink, this image just seemed to be calling for it. Layering is pretty in pink, black, and some Basic Grey paper.
The sentiment is from Teeny Tiny Wishes (SU), punched with a word window punch and backed with a modern label punch. Both pieces were edged with black marker.
The image and sentiment are both raised on dimensional foam tape.
Thanks so much for stopping by today.
Friday, May 17, 2013
friday feature - possibilities
Hello my friends. It's time for another Friday feature on the OWSE blog. Today I made a card with some new toys I got... anniversary, mother's day, and birthday all fall within the same week.
Step by step instructions can be found over on the OWSE blog. Be sure to stop over there.
Thanks for stopping by.
Step by step instructions can be found over on the OWSE blog. Be sure to stop over there.
Thanks for stopping by.
Labels:
distress paint,
Friday feature,
OWSE,
Sizzix,
Tim Holtz
Thursday, May 9, 2013
friday feature - big little things
Hi everybody. It's time for my Friday feature over on the OWSE blog.
Step by step instructions are available at Crafting with OWSE.
Thanks for stopping by.
Step by step instructions are available at Crafting with OWSE.
Thanks for stopping by.
Labels:
cuttlebug,
Friday feature,
OWSE,
recycle/reuse,
Sizzix,
Tim Holtz
Saturday, May 4, 2013
friday feature - making stencils.
Hi friends. It's time for another Friday Feature over on the OWSE blog. I never seem to have enough stencils, so I've made some of my own. I explain how on the Friday Feature this week.
Here's a card I made using one of the stencils I made.
This card is also made for the mix-ability challenge on SCS. Thanks so much for stopping by. Have a great weekend.
Here's a card I made using one of the stencils I made.
This card is also made for the mix-ability challenge on SCS. Thanks so much for stopping by. Have a great weekend.
Labels:
acrylic paint,
cuttlebug,
Friday feature,
mix-ability challenge,
mixed media,
OWSE,
Sizzix,
Tim Holtz
Sunday, April 28, 2013
bell flowers
Hi friends. I think maybe my mojo is sneaking back. I sat down to create this morning and it happened!
Robyn over at OWSE Yahoo group presented us with a quick fire challenge this morning to create something with either birds or bees. I decided to make another page to go in the journal I started in January (21 cards) for Motley Soul Mixed Media Art.
The page is 4"x6" made from cereal box chipboard, covered with coffee filters, gesso and paint. The background was already done, and I chose to just work with it as is.
I found the chipboard vine (Sizzix) in my stash and covered it with vintage photo distress ink.
Then I die cut a bunch of the tiniest flower on the tattered florals die (Tim Holtz) from a blue card stock and sponged the petals with seedless preserves distress ink. I snipped into the center between two of the petals and then used a stylus and my fingers to form the flowers into a bell shape. I glued them onto the vine and added some highlights on the petals with a white gel pen. A black sharpie was used to make the stamen. The flowers look really flat in the photo, but they are actually very dimensional and stand out about 1/4" from the page.
The bird from caged bird (Tim Holtz) was die cut from the same blue card stock, embossed with tiny mosaic embossing folder and sponged with seedless preserves. I attached the bird with dimensional tape.
The sentiment was hand written with a sharpie marker.
I'm also entering this in the mix-ability challenge #13 and the free for all challenge #166 on SCS.
Thanks so much for stopping by. Have a great week.
Robyn over at OWSE Yahoo group presented us with a quick fire challenge this morning to create something with either birds or bees. I decided to make another page to go in the journal I started in January (21 cards) for Motley Soul Mixed Media Art.
The page is 4"x6" made from cereal box chipboard, covered with coffee filters, gesso and paint. The background was already done, and I chose to just work with it as is.
I found the chipboard vine (Sizzix) in my stash and covered it with vintage photo distress ink.
Then I die cut a bunch of the tiniest flower on the tattered florals die (Tim Holtz) from a blue card stock and sponged the petals with seedless preserves distress ink. I snipped into the center between two of the petals and then used a stylus and my fingers to form the flowers into a bell shape. I glued them onto the vine and added some highlights on the petals with a white gel pen. A black sharpie was used to make the stamen. The flowers look really flat in the photo, but they are actually very dimensional and stand out about 1/4" from the page.
The bird from caged bird (Tim Holtz) was die cut from the same blue card stock, embossed with tiny mosaic embossing folder and sponged with seedless preserves. I attached the bird with dimensional tape.
The sentiment was hand written with a sharpie marker.
I'm also entering this in the mix-ability challenge #13 and the free for all challenge #166 on SCS.
Thanks so much for stopping by. Have a great week.
Thursday, April 25, 2013
friday feature - butterflies
Hi friends. It has been one of those weeks where my mojo has been on vacation. But I knew that I needed to get something done to post on the OWSE blog for tomorrow's Friday feature. Here's my card.
And you can find all the details over on the OWSE blog.
Thank you so much for stopping by.
And you can find all the details over on the OWSE blog.
Thank you so much for stopping by.
Friday, April 5, 2013
circle flowers
Hello friends. Today I made a card that combined two challenges on SCS: the mix-ability challenge #10 -- circle flowers using no dies or punches, the free for all challenge #163 -- birthday card with glitter, and one of the April challenges from the OWSE Yahoo group -- book paper, tissue paper, or music paper was a requirement.
I started by using some of the spray paints (which I made following this tutorial) and spraying them on some old book pages. Once they were dry, I cut out circles in different sizes to layer as flowers. I crumpled them up and then flattened them out, so they would have some texture. I glued three layers together for each flower. The flower centers are also pieces of book pages all scrunched into a little ball. I added glitter to the centers.
The stems and leaves are cut free hand from the book pages as well.
I used a piece of hand made washi tape (made with scor-tape and used coffee filter + stamps and ink) along the bottom of the card, and added some faux stitching around the edge.
The sentiment from Hero Arts is stamped in jet black archival ink.
Thanks so much for stopping by. Have a great weekend.
I started by using some of the spray paints (which I made following this tutorial) and spraying them on some old book pages. Once they were dry, I cut out circles in different sizes to layer as flowers. I crumpled them up and then flattened them out, so they would have some texture. I glued three layers together for each flower. The flower centers are also pieces of book pages all scrunched into a little ball. I added glitter to the centers.
The stems and leaves are cut free hand from the book pages as well.
I used a piece of hand made washi tape (made with scor-tape and used coffee filter + stamps and ink) along the bottom of the card, and added some faux stitching around the edge.
The sentiment from Hero Arts is stamped in jet black archival ink.
Thanks so much for stopping by. Have a great weekend.
friday feature
Hi friends. I have an new Friday feature over on the OWSE blog today.
Be sure to stop over there for step by step instructions on how I made my card.
Thanks so much for stopping by.
Be sure to stop over there for step by step instructions on how I made my card.
Thanks so much for stopping by.
Labels:
cuttlebug,
faux buttons,
Friday feature,
OWSE,
Sizzix,
SU,
Tim Holtz
Friday, March 22, 2013
masculine card
Hello friends. The month of March seems to be flying by, and today I realized that I hadn't yet made anything for the zoo challenge for this month at OWSE Yahoo group. We're supposed to use an animal seen at the zoo. Well, my collection of stamps doesn't include many animals, and it's been a long time since I've visited a zoo, but I'm pretty sure you can see deer there. So I pulled out my deer stamp from Biblical Impressions and made a masculine card.
I have boxes which become a catch-all for leftover paper scraps, images, etc., and often I'll just pull out some of those things to start a project. That is exactly what I did for this card. Everything on this card, with the exception of the stamps, ink, and brads, was found in one of those boxes.
I stamped the card base with a leaf stamp from Paper Inspirations with peeled paint. Then I stamped flannel plaid (SU) over that with rusty hinge.
The deer and sentiment (unknown) was stamped with jet black archival ink. I colored in the letters with a tea dye distress marker.
I used a corner chomper on the rust piece and added vintage photo on all the edges, as well as over the ridges of some torn corrugated cardboard.
I added some brads and tied a piece of red raffia around the cardboard.
Usually I struggle with masculine cards, but this one went together fairly quickly.
Thank you so much for stopping by.
I have boxes which become a catch-all for leftover paper scraps, images, etc., and often I'll just pull out some of those things to start a project. That is exactly what I did for this card. Everything on this card, with the exception of the stamps, ink, and brads, was found in one of those boxes.
I stamped the card base with a leaf stamp from Paper Inspirations with peeled paint. Then I stamped flannel plaid (SU) over that with rusty hinge.
The deer and sentiment (unknown) was stamped with jet black archival ink. I colored in the letters with a tea dye distress marker.
I used a corner chomper on the rust piece and added vintage photo on all the edges, as well as over the ridges of some torn corrugated cardboard.
I added some brads and tied a piece of red raffia around the cardboard.
Usually I struggle with masculine cards, but this one went together fairly quickly.
Thank you so much for stopping by.
Friday, March 8, 2013
21 cards - #34
Hello friends. You would think I can't count! LOL The numbers just don't seem to correlate because the 21 cards have TWO sides. I think that means I have four more cards, but both sides, to go. But, I know that I remade one, so my total will be 43 instead of 42. Are you totally confused yet?
These are pages I'm making, which started as a challenge in January at Motley Soul Mixed-Media Art. I was one of the winners of a handmade book by Mika, and it came in the mail today. Very, very cool. I'm not sure what I'll put in it yet. Maybe I'll just sit and admire all her wonderful pages. By clicking on the link above, you can see some of them that she has made. This is my Friday Feature on the OWSE blog.
I decided to double up on this card, so I used the mix-ability challenge today on SCS for a start to my page. I started with my base (made previously) of cereal box chipboard, covered with reused coffee filters and coated with gesso. Then I tore some newspaper and glued it on with matte Mod Podge. When that was dry, I brushed some gesso over it.
I was being impatient, so I used my heat gun a lot to dry each layer.
Next I used some distress ink sprays, made with reinkers and water, and sprayed my page. I used mustard seed, barn door, and faded jeans. Some I blotted away with paper towel.
Next I did some stamping with Nature's Moments (Tim Holtz/Stamper's Anonymous). Flowers were colored with distress markers and stains, and the bird and sentiment were stamped with jet black archival.
I added some washi/tissue tape from Tim Holtz & 7 Gypsies, as well as some that I made myself with coffee filters and scor-tape. A couple of them were brighter than I wanted, so I rubbed some gesso wash over them with my finger.
Finally, I added a couple of black mini flourishes (Sizzix), but I again decided there was too much contrast, so I blotted some more gesso wash over the flourishes with a cotton ball.
Thanks so much for stopping by.
These are pages I'm making, which started as a challenge in January at Motley Soul Mixed-Media Art. I was one of the winners of a handmade book by Mika, and it came in the mail today. Very, very cool. I'm not sure what I'll put in it yet. Maybe I'll just sit and admire all her wonderful pages. By clicking on the link above, you can see some of them that she has made. This is my Friday Feature on the OWSE blog.
I decided to double up on this card, so I used the mix-ability challenge today on SCS for a start to my page. I started with my base (made previously) of cereal box chipboard, covered with reused coffee filters and coated with gesso. Then I tore some newspaper and glued it on with matte Mod Podge. When that was dry, I brushed some gesso over it.
I was being impatient, so I used my heat gun a lot to dry each layer.
Next I used some distress ink sprays, made with reinkers and water, and sprayed my page. I used mustard seed, barn door, and faded jeans. Some I blotted away with paper towel.
Next I did some stamping with Nature's Moments (Tim Holtz/Stamper's Anonymous). Flowers were colored with distress markers and stains, and the bird and sentiment were stamped with jet black archival.
I added some washi/tissue tape from Tim Holtz & 7 Gypsies, as well as some that I made myself with coffee filters and scor-tape. A couple of them were brighter than I wanted, so I rubbed some gesso wash over them with my finger.
Finally, I added a couple of black mini flourishes (Sizzix), but I again decided there was too much contrast, so I blotted some more gesso wash over the flourishes with a cotton ball.
Thanks so much for stopping by.
Thursday, March 7, 2013
arch #3
Hello again. Yesterday was a productive day creatively, but I decided to wait until today to get pictures, rather than try to get a decent picture using my flash.
Even though I'm not a participant, I've been working along with the arch swap group at OWSE Yahoo group to make an arch each month. (Clicking on the 'arch' tag should bring up all the previous arches.) So today I have my arch for March. The theme is butterflies and flowers -- uhhhmmm... that's a no-brainer!
My base is cereal box chipboard covered with reused coffee filters, and coated with gesso. I added several colors of acrylic paint with my fingers.
The flowers & leaves (SU) are stamped with jet black stazon and colored with ripe persimmon distress stain (super easy coloring technique). Then I cut them out and arranged them on the arch before attaching them with glue.
The butterflies (Hero Arts) are stamped with tuxedo black memento ink and colored with Copic markers. I added some white gel pen highlights. After cutting them out, I attached them with glue, but the wings are raised with dimensional foam tape. I also added some trails with black marker.
The sentiment is computer generated.
Thanks for stopping by.
Even though I'm not a participant, I've been working along with the arch swap group at OWSE Yahoo group to make an arch each month. (Clicking on the 'arch' tag should bring up all the previous arches.) So today I have my arch for March. The theme is butterflies and flowers -- uhhhmmm... that's a no-brainer!
My base is cereal box chipboard covered with reused coffee filters, and coated with gesso. I added several colors of acrylic paint with my fingers.
The flowers & leaves (SU) are stamped with jet black stazon and colored with ripe persimmon distress stain (super easy coloring technique). Then I cut them out and arranged them on the arch before attaching them with glue.
The butterflies (Hero Arts) are stamped with tuxedo black memento ink and colored with Copic markers. I added some white gel pen highlights. After cutting them out, I attached them with glue, but the wings are raised with dimensional foam tape. I also added some trails with black marker.
The sentiment is computer generated.
Thanks for stopping by.
Labels:
acrylic paint,
arch,
Copic Markers,
gesso,
Hero Arts,
mixed media,
OWSE,
recycle/reuse,
SU
Subscribe to:
Posts (Atom)