Showing posts with label box. Show all posts

Tuesday, October 13, 2020

more round boxes

 Hi friends.  Can you tell I like making these little boxes?  I made one for a contest that required a pumpkin.  So... I made the pumpkin... a pumpkin box actually.  

And a better view of the cover.  

I used some silk leaves, which I cut down a bit so they fit better.  I went outside and picked up a few sticks to use as a handle.  They were really dry, so I hope it doesn't break.  But I guess it would be easy enough to replace if it did.  

This next box was a special request by my cousin.  She really liked the floral one I made, so this is pretty similar.  I used a different flower stamp, and the flower on the cover is paper, whereas the other one was silk.  

And here is the cover.  I punched and die cut some different sized flowers, and cut the petal separations deeper.  Then I sponged all the edges with candied apple distress ink.  I turned them over and used a stylus and a thick foam mat to give them more shape and dimension.  Then I glued all the layers together, added some leaves, and glued the flower onto the cover.  

I remembered that I had some decoupage medium (hmmm... actually I have four jars) that would work to give this a nice smooth finish.  Although I didn't check, I'm pretty sure that all the jars have been opened, so hopefully, they are still all usable.  The one I used just needed to be stirred a bit before use.  I normally use matte mod podge, but I only have a little bit left, and I've been procrastinating going shopping for more.  Plus, sometimes it leaves the surface a bit sticky.  I think that may have something to do with the humidity.  I've really been trying to use up what I have instead of buying more.  A while back, I was watching a video, and the girl used a 1:1 mix of water and white glue as a finish.  I absolutely would do that, but I've also used almost all of my white school glue, because I ran out of tacky glue, which is really my favorite for putting this type of project together.  I like it because it's not so runny and dries with less bubbling.  But I found if I use a very thin layer of white glue, that works quite well, too.  

Thank you so much for stopping by to visit.  I always appreciate that. 


Thursday, September 17, 2020

and one more...

I really loved the look of the last box I made, but thought a few more details would make it even better.  The last two boxes went to the neighbors, since both of the kids had birthdays.  So I made another. 


If you want details on how I made this, please check my previous two posts.  

Thank you so much for taking time to stop by today.  Be blessed. 


Saturday, September 12, 2020

Can't make just one

Hi friends.  You probably know by now that I can't make just one.  I've made a number of these little boxes over the past few years.  Well, I figured that I really needed to make one for the boys.  Yeah.  No flowers or pretties on it.  How about WOOD?  Well, yes, I would if I weren't afraid to use some of those woodworking machines.  So what's the next best thing?  Faux wood, of course.

I use faux wood techniques quite often in cardmaking, so why not on a box.  The basic technique to create faux wood is to drag ink pads down the paper, repeating with several colors - mostly working in browns, but other colors work as well.  

Recently, I discovered a variation from my friend Ann on Split Coast Stampers.  What I like about this technique is the color is smoother than simply dragging the ink onto the paper.  

Please refer to my last post for more details on the basic construction of the box.  

I used a 4"x12" piece of barely banana card stock and smaller pieces for the cover and bottom.  Start by scoring lines every half inch across the card stock.  You can vary the width between score lines if you want.  The next step can be done on either side of the paper.  I prefer to use the bumpy side, because the ridges pick up the darker inks and give board delineations.  The other side portrays those lines as the color of your light card stock.  Either way works.  Put some white glue (I'm using Elmer's school glue) on the paper and use an old gift card to spread it all over the paper.  Then let it dry.  I'm pretty sure you could speed up the drying with a heat gun, but the heat will bubble the glue, so I prefer to just let it air dry.  

Once the glue is dry, drag your ink down the card stock in the same direction as your score lines.  I used distress inks: antique linen, tea dye, vintage photo, and early espresso.  The two lighter colors, you can use a heavy hand when dragging, but you want to go lighter on the vintage photo, and much less with the early espresso.  I also will lightly swipe the edge of the darkest color randomly to add a bit more detail for wood grain.  

Once that was dry, I measured and trimmed the ends to meet without overlapping.  Then I attached the strip around the box, cut wedges along the bottom and glued those to the bottom.  Circles were cut from the faux wood for the bottom and cover of the box.  

I painted the edge of the cover brown to blend in with the wood.  Everything was given a coat of Matte Mod Podge.  


 I see in the photo that I managed to get the seam right in the front, so you can see how that works.  It shows less on the wood grain than it did on the previous box, but I do like the flat seam better than overlapping.

This box went together much faster than the previous box, because there was no stamping required.  Other than drying time, the faux wood is a very quick technique.

Thank you so much for taking time to stop by today.  Have a wonderful day. 


Friday, September 11, 2020

my latest project

Hello my friends.  A friends daughter just had a birthday, and I wanted to make something for her.  Since I do a lot of thread crochet, I have the cardboard spools left from the thread.  I save them unless they are really mutilated.  They make great little boxes.  

Since these are open-ended, it's necessary to add a bottom, and I normally also want to have a cover.  I have a number of circle dies, so I try to find one that fits the diameter of the tube.  Then I use chipboard to cut the circles.  I keep chipboard from cereal boxes, cracker boxes, the backs of paper pads, etc., anything that is sturdy and not all bent.  If necessary, I glue layers together to make it sturdy.  

For this box, I only used a single thickness for the bottom, but the cover is six layers -- three the sit on top and three that fit inside the box to keep the cover in place.   Since it's difficult to cut multiple layers, I cut the circles individually, and then glue them together.  I place them beneath some old encyclopedias, while the glue dries, so they remain flat.  

Then comes decorating.  For this box, I stamped some poppies on a 4"x12" piece of light yellow cardstock.  Then I colored them with watercolor pencils and blender pen.  Over the top of the flowers, I randomly stamped a crackle background and old writing.  I glued the strip around the tube.  Instead of overlapping the strip as I usually do, I trimmed the ends to meet, creating a smoother box.  Along the bottom edge, I cut out wedges, and folded the points over to the bottom and glued them.  I added another cardstock circle on the bottom to cover those. 

I sponged the edges with coffee archival ink, and then sponged on a thin layer of matte mod podge to seal it.  

For the cover, I first glued all the layers together.  I used an emery board to smooth the edges.  I glued cardstock circles to the top and bottom of the cover.  Then I stamped a different poppy five times on some scraps of cardstock, colored them the same as the others, and cut them out.  After stamping the background, I glued the cut flowers around the top of the cover.  I sponged the edges, and added the matte mod podge.  I decided I wanted to add some metallic gold lumiere paint randomly to the whole box, so I used a dry brush technique for that.  It doesn't really show up in the picture.  For the center of the cover, I used some silk flowers.  I put a jewel brad in the center to hold all the layers together.  Then I painted the flower petals with some shimmery paint.  The flower is attached to the box with hot glue.  

One last special touch was to decorate the underside of the cover.  I die cut a fun little medallion and painted it gold for the center, and then I added a special message with die cut letters, because we all need to be reminded.  The letters are actually red; I'm not sure why they look pink. 


Thank you so much for taking time to visit today.  I hope you are staying safe and well.


Friday, August 7, 2020

The SU ink topper

 Hi friends.  Well, I did it.  I spent quite a bit of time yesterday and today putting it together, but I finally finished small rack for the top of my SU ink storage.  I have 15 older ink pads which didn't fit in the main rack, and whenever I wanted to use them, I had to literally dig them out from where they were stored.  Now, they are with all the others.  I store all my inks alphabetically, but for the moment, I'm not going to incorporate these into the rack with the rest, for the simple reason that I've gotten so familiar with the position of the inks in the rack, I don't really have to look for them.  I know certain ones are at the top or bottom, etc.  I may change my mind on that later.  

Since there was plenty of space, I added slots for the ink pads, an open area on the side of those for the few refills that I have matching these inks, and a deeper spot in the center for markers.  

Because there's a bit of a well in the top of the wood rack, I added several layers of corrugated cardboard beneath the new storage rack, so that it sits above the wood.  Otherwise I wouldn't have been able to use the bottom slots.  

Here's the picture.

Thank you so much for visiting today.  Have a wonderful day.


Wednesday, August 5, 2020

More ink storage

Hi friends. 

After making the large revolving rack for storing my distress ink pads, I knew that I also wanted to make storage for other inks that I have, since they were being stored in places not very accessible.  So, using the same method I used for building the other rack, I made four more smaller racks that fit my other ink pads.  Since these were not all the same size, I made them to fit groups of similar ink pads. Which means they are different sizes.  But I moved my ribbon, so I could put these in a place easy to reach. 
The upper left unit holds archival and a couple other Adirondack inks, VersaMark, Encore, and Fabrico inks.  Lower left holds Brilliance and Stazon inks.  Upper right holds ColorBox pigment inks.  Lower right holds ColorBox Chalk inks and a few thicker pigment inks. 

I do have some Kaleidacolor inks, but haven't decided yet if I will make a unit for those.  I probably will. 

My Stampin' Up ink pads, refills, and markers are stored in a wooden revolving rack that I won years ago.  However, I have more inks than fit in it, so I'm planning to make a small rack (or more than one) to fit on top of that revolving unit to hold those extra inks. 

While in the process of all this building, I also made a couple of boxes to hold some things.  I have a stand that I wanted to make some open boxes for. 
There are ridges near the center and the center post, so I needed to work around those.  I made 4 parts for each shelf, but because of the angles involved, and the chipboard is thicker than I usually work with, they were a little too big, and didn't fit.  So I glued them together where the angles meet, added a bottom piece and made these instead. 

I don't know how to figure the angles, so it was mostly guesswork.  They are not perfect, not fancy, and not pretty, but will work to hold something.  I haven't quite decided what yet.  I will probably try again to make something that fits, but not this design.  I know I can add a filler and just build on top of the ridges, which would make it much easier, so I may do that. 

Thanks so much for taking time to visit today.  Stay safe and be blessed.

Thursday, September 7, 2017

pop up cube card

Hi friends.  You may have noticed that I haven't posted anything in ages.  I think there are days (maybe weeks, even) that I completely forget that I have a blog.  Must be senior brain cells at work. 

Anyway, today I made a couple of birthday cards for the neighbor boy and girl across the street.  They have birthdays on consecutive days. 

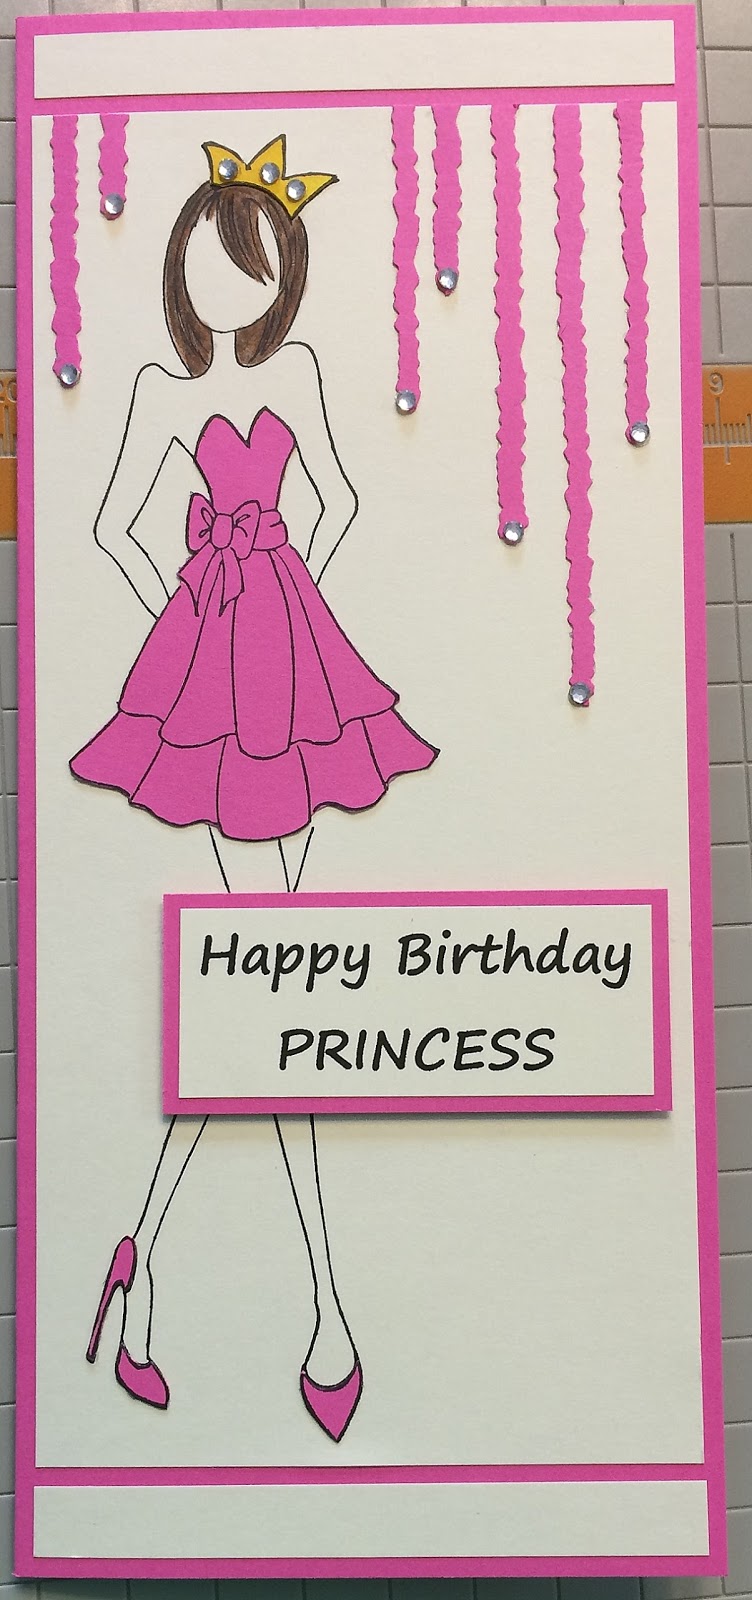
I made a girlie girl card for her. 
The stamp is one of the Prima mixed media dolls by Julie Nutting.  I did paper piecing for the dress, shoes and crown, and colored the hair with watercolor pencils and blender pen.  I added some streamers, which were cut with deckle scissors, and added some rhinestones. 

Because he is very involved in baseball, I had to make some sort of baseball card of course.  Some time ago, I made a fun pop up cube box following this video.  It's really a fun card, but the thing I don't like about it is that it isn't flat, so it doesn't mail easily.  I did a little browsing online and found some ads showing more of a wrap than a box, so I decided to figure out how to use that instead of the box.  I did see a video that made a cube inside of a card, but the dimensions were smaller and the girl doing the video used a tool which I don't have, so I would need to refigure all the dimensions, and I really didn't have time to, if I wanted to get the card done today.  Instead, I realized that the 3" cube would fit inside a 3-5/8"x6-1/2" envelope, so I made the wrap 3-1/2"x6-1/4" to fit that, and the cube fits inside flat.  This is the front outside of the wrap. 
This is the back side.  I made a slit and a tab to fit in it, which holds the card closed.  My camera died last week, so I've been using my phone to photograph my cards.  I've no idea why this came out vertical. 
The paper is kraft, so I used a sponge dauber and white pigment ink to press and twist a bit to make the baseballs white.  I heat set them to make sure the ink was dry.  When you pull the tab out, the cube inside literally flies out - really fun.  I think it actually works better than in the box, because if you don't pull the box out quickly, you really don't get the pop.

Here is the card open.  

Thanks so much for stopping by. 

Monday, May 15, 2017

box with a secret drawer tutorial

Hi friends.  I have another tutorial for you.  I thought it would be fun to make a little box with a pull out drawer inside.  I started with a white one, and then added some pretty paper and a flower on the outside of the box.  I also made one from some heavy designer paper with a cream colored drawer inside.  The only tools you need are a ScorPal or other scoring tool, scissors, a 1/2" corner rounder & a 1/2" circle punch.


For the drawer, you need a 6-1/8"x7-7/8" piece of card stock.  Score each side at 7/8" and 1-3/4".  Marked in green on the diagram below.

On the short sides, cut on all 4 scores to the 2nd cross score.  On the long sides, cut on the outer scores to the 2nd cut; cut on the inner scores to the 1st cut.  This will remove the 3 corner squares, creating tabs.  Cuts are marked in black.  The highlighted areas are being cut away. 

The sides of the drawers will be double for added durability.  Cut the tabs and the outer sections at a slight angle.  It should look like this.

Valley fold all scores.  Bring the small tabs to the inside and glue them to the adjacent panels on the ends of the drawer.  Then glue all the remaining panels to the inside of the drawer.  The tabs will be hidden between the layers.  You can add pretty paper to the sides and inside bottom of the drawer, if desired. 

For the box, you need an 8-1/2"x7-1/2" piece of card stock.  On the long side, score at 1", 3-3/4", 4-3/4", and 7-1/2".

On the short side, score at 1", 5-1/2", and 6-1/2".

Referring to the diagram below, cut on the score lines as shown, creating tabs and removing highlighted areas.

Cut the small square tabs at a slight angle.  Valley fold all scores.  Use a 1/2" corner rounder to round the corners on the piece extending at the bottom of the diagram.  (I forgot to do that before taking a picture.) 

Fold the left edge in at the 1st score, add adhesive to that folded panel, bring the right side of box over to the edge and flatten to form a tube.  If you are decorating the outside of the box, it's better to do so before you glue the end closed.  However, it is possible to decorate after the box is all put together.  That's what I did. 

Glue the tabs to the outside of the end panel, and then glue the 2nd end panel over the tabs, hiding them between the panels.

On the open end where the flap tucks in, punch a half circle notch in the top panel.  This will make it easier to open the box and pull out the drawer.

I added a flower and leaves to the top of the box.

And here it is with the drawer tucked inside.

On the second one, I added the same paper to the inside and outside of the drawer.

Here they are closed.  When you open the box, finding a drawer inside is a fun surprise.  The dimensions of the box are 4-1/2"x2-3/4"x1".  The drawer is about 1/8" smaller in each direction. 

I hope you've enjoyed my tutorial and make lots of boxes with secret drawers inside.

Thank you so much for taking time to visit today. 

Friday, April 28, 2017

house boxes tutorial

Hi friends.  Sorry it's been so long since I've posted.

The last couple of days I've been working on a little box - shaped like a house.  I know there are some dies out there that you can use to create something similar, but I was sure I could make one without a die.

I remember my dad making little wooden houses and other buildings from 2x4's for my siblings and myself when we were children.  He painted them, including windows and doors.  These little boxes remind me of those.

I wasn't sure what size to make, so I started with a prototype from a JoAnn's flyer, which was 6"x11".  I ended up cutting a half inch off the end.
But, I really wanted it a bit taller, not a lot, just a half inch, so I ended up using card stock that was 6-1/2"x10-1/2".  On the long side, score at 3", 5", 8", and 10".  I used a green marker to show the score lines. 
Then turn 1/4 turn to the left and score at 4" and 6".
Turn 1/2 turn and at 5", mark the top edge, and score across the 2" panels and the 1/2" panel.
Turn 1/4 turn to the left and mark the top edge at 1-1/2" and 6-1/2".
Use a straight edge and bone folder to score diagonally from these marks as shown in the next diagram.
You need to do diagonals in both directions to form the roof peaks.  This is what your score lines should look like. 
Next, cut on all the vertical scores; from the bottom up to the 2nd cross score, and from the top down to the 1st cross score.  The cut lines are in black. 
At this point, you will need to trim away the sections that are shaded below.
On the 3 bottom tabs and the side tab, trim at a slight angle to make fitting easier.  Your house should now look like this.
I proceeded to put the box together and forgot to stamp it.  You really want to do that while it is still flat.  You may want to add designer paper instead of stamping, or get really creative with mixed media.  Any dimensional embellishments can wait until the house is all together. 

Once you have the sides stamped or decorated, you can start putting it together.  I flip it over; fold the 2" and 1/2" panels toward the center.  Using whatever adhesive you choose (I used Tombow Mono multi glue) by putting adhesive on the 1/2" tab.  Fold over the farthest panel and press onto the tab.
To form the roof area, the angled tabs are adhered to the straight flaps.  It is easiest to put them on top rather than underneath.  They will get covered by the roof, so they will not show. 
For the roof, cut a piece of card stock 2"x4-1/4"; score at 2-1/8".  I embossed this one in my Tim Holtz notebook embossing folder, and then inked it with vintage photo distress ink.  You can use any embossing folder you choose, or make shingles using a border punch or die.  I know I want to make one with corrugated cardboard for a roof.  You'll see another house below with shingles using Tim's vintage rooftops die.   
Glue the rooftop onto the house.  It does not have any overhang.  If you want that, you need to cut this piece a bit larger.
Close the house box at the bottom.  Now you can add any other decorations you wish.
I added the designer paper after I had the house all glued together, but it would have been much easier to do it first.  I only added embellishments to one side.  The finished size is 4" high, 3" wide, and 2" deep. 
Here's one I made from the same card stock, but stamped the sides.
And another one from designer card stock.  This is the one with the shingles.
And here they are all together.
I hope you like my tutorial and will try these.  This will make a nice gift box or you could make a whole village.  I know I will be making more.

Thank you so much for stopping by.