Hi friends. Sorry it's been so long since I've posted.
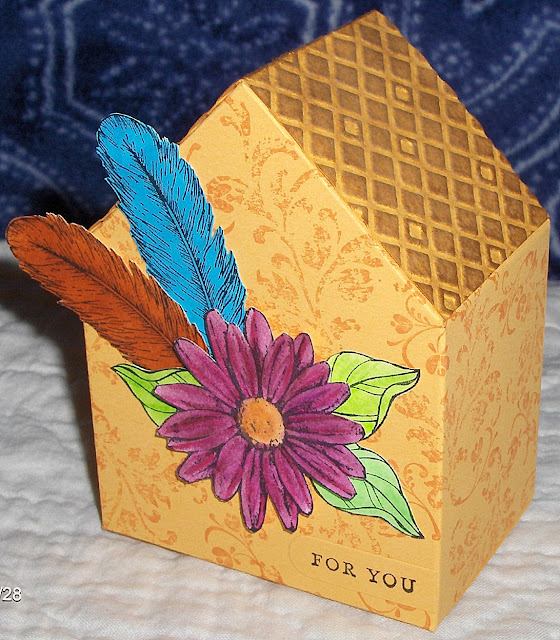
The last couple of days I've been working on a little box - shaped like a house. I know there are some dies out there that you can use to create something similar, but I was sure I could make one without a die.
I remember my dad making little wooden houses and other buildings from 2x4's for my siblings and myself when we were children. He painted them, including windows and doors. These little boxes remind me of those.
I wasn't sure what size to make, so I started with a prototype from a JoAnn's flyer, which was 6"x11". I ended up cutting a half inch off the end.
But, I really wanted it a bit taller, not a lot, just a half inch, so I ended up using card stock that was 6-1/2"x10-1/2". On the long side, score at 3", 5", 8", and 10". I used a green marker to show the score lines.
Then turn 1/4 turn to the left and score at 4" and 6".
Turn 1/2 turn and at 5", mark the top edge, and score across the 2" panels and the 1/2" panel.
Turn 1/4 turn to the left and mark the top edge at 1-1/2" and 6-1/2".
Use a straight edge and bone folder to score diagonally from these marks as shown in the next diagram.
You need to do diagonals in both directions to form the roof peaks. This is what your score lines should look like.
Next, cut on all the vertical scores; from the bottom up to the 2nd cross score, and from the top down to the 1st cross score. The cut lines are in black.
At this point, you will need to trim away the sections that are shaded below.
On the 3 bottom tabs and the side tab, trim at a slight angle to make fitting easier. Your house should now look like this.
I proceeded to put the box together and forgot to stamp it. You really want to do that while it is still flat. You may want to add designer paper instead of stamping, or get really creative with mixed media. Any dimensional embellishments can wait until the house is all together.
Once you have the sides stamped or decorated, you can start putting it together. I flip it over; fold the 2" and 1/2" panels toward the center. Using whatever adhesive you choose (I used Tombow Mono multi glue) by putting adhesive on the 1/2" tab. Fold over the farthest panel and press onto the tab.
To form the roof area, the angled tabs are adhered to the straight flaps. It is easiest to put them on top rather than underneath. They will get covered by the roof, so they will not show.
For the roof, cut a piece of card stock 2"x4-1/4"; score at 2-1/8". I embossed this one in my Tim Holtz notebook embossing folder, and then inked it with vintage photo distress ink. You can use any embossing folder you choose, or make shingles using a border punch or die. I know I want to make one with corrugated cardboard for a roof. You'll see another house below with shingles using Tim's vintage rooftops die.
Glue the rooftop onto the house. It does not have any overhang. If you want that, you need to cut this piece a bit larger.
Close the house box at the bottom. Now you can add any other decorations you wish.
I added the designer paper after I had the house all glued together, but it would have been much easier to do it first. I only added embellishments to one side. The finished size is 4" high, 3" wide, and 2" deep.
Here's one I made from the same card stock, but stamped the sides.
And another one from designer card stock. This is the one with the shingles.
And here they are all together.
I hope you like my tutorial and will try these. This will make a nice gift box or you could make a whole village. I know I will be making more.
Thank you so much for stopping by.
Friday, April 28, 2017
house boxes tutorial
Labels:
3-D items,
box,
cuttlebug,
fancy folds,
house box,
Sizzix,
special folds,
SU,
Tim Holtz,
tutorials
Subscribe to:
Post Comments (Atom)


5 comments:
These are amazing! Great directions. Don't know if I will do it, but yours are adorable. Thanks for sharing!
They are very nice, Melody. I do remember the wooden block houses.i wonder if this is something my wife and granddaughter would like to do together.
These are very nice houses, Melody I remember the wooden ones very well.
This looks like a nice project for my wife & granddaughter to do together.
They are both more artistic than me.
Fabulous project! Could we feature it on our Scor-Pal web site and Blog? My E-mail is sunshinedi@shaw.ca
Diana Crick, creator of Scor-Pal
Oh Melody,
These are just adorable! How cute it would be to make a little village of them. :)
Post a Comment