Showing posts with label technique challenge. Show all posts

Saturday, September 24, 2016

choo choo

Hi friends.  I've been having fun with waterfall cards lately.  Originally, I think these were meant to be vertical, so they actually represented a waterfall, but I've seen also some horizontal ones.  I've been using the horizontal layout.  Sometimes, I think either would work, but occasionally, the horizontal style is necessary.  They appear to be a complicated card, but really are rather simple.  I've also done some experimenting with the size of the actually moving parts. Here are some I've recently made. 

I made this floral one for a technique challenge on SCS.  Then I used it as one of the techniques in my class this month.  I realized that as long as the moving parts fit underneath the brace strip, I could pretty much do anything on this.  The butterfly extends beyond the pull strip, but is on on stationary part of the strip. 

This one was a card request by my DH for a friend he plays volleyball with.  These are the colors on their shirts. 

And this one was made for a little 4 year old boy who loves trains.  He just had some surgery and I hope this will cheer him up.  I really stretched the parameters on this one.  I made the pull strip 1/2" wider than normal, and all of the train cars extend above or below the strip, but I made sure they would still fit under the brace.  Because this card will most likely be played with a bit, I doubled the eyelets on the brace for more stability.  The engine.

The coal car. 

The box car. 

And the caboose. 

Thank you so much for stopping in for a visit today. 


Thursday, April 14, 2016

lilies

Hi friends.  I was thinking that I should really post something on my blog, so I logged in and found that it's been over a month and a half since my last post.  How neglectful of me!

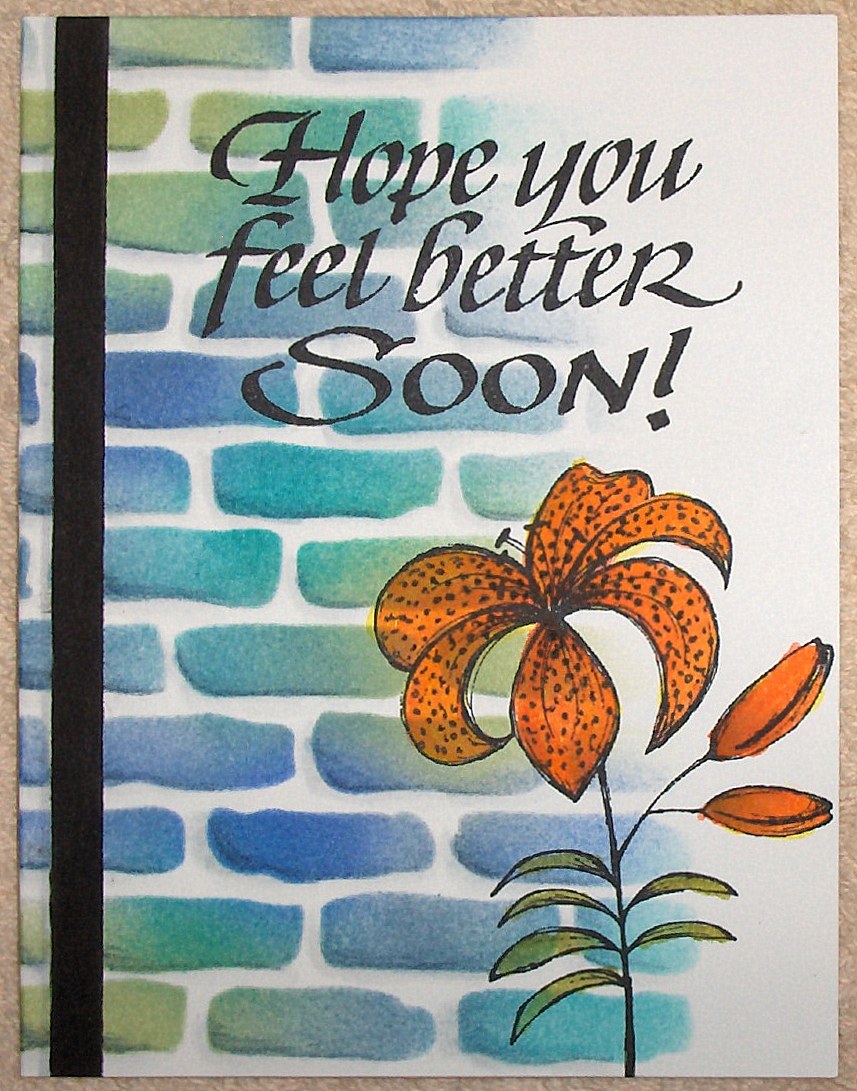
So here I am to show you a couple of cards I've made recently.  I bought a couple flower stamps on a facebook group.  One is a lily.  It reminds me of the tiger lilies my mom always had in her garden.  So the first card I made with it is a tiger lily.

This is a no layer card with no embellishments, made for a technique challenge on SCS.  The background was done with sponging through a stencil.  Then I added some shading with inktense pencils and gray copic markers.

I stamped the image right over the background and colored it by pressing distress ink onto a plastic sheet & picking up the color with a water brush.  I added the speckles with a black Pitt pen.

The black 'ribbon' was made by using painters tape to mask off part of the background, leaving a narrow opening and then inking the open area.

I decided to make another card using the lily.  This one was for the alpha challenge for the letter L.  I used lilies and lace to represent L. 

The lace edging is hand crocheted and I just happened to have one the right color to match my lily.  The other flowers are made with 3 different sized punches of the same shaped flower.  I sponged the edges, added some dots in the middle, and pressed the centers with a stylus to give them some form.  The leaves are a Martha Stewart punch.

Thanks so much for stopping by today.  Hopefully, my next post won't keep you waiting so long. 

Friday, September 4, 2015

a card or two

Hi friends.  I don't know where the time has gone.  Somehow, more than a month has gone by & I haven't blogged.  I made two cards this week that weren't for one of my classes.  They were for the technique challenge on SCS.  The challenge was for a cute little fold up on the front of the card. 

When I looked at the instructions, I thought they sounded more complicated than was necessary, so I changed mine a bit.  I cut a piece of cardstock 3" x 8.5" and scored it at 2", 4", and 6", so that when folded, the back panel extended 1/2" above the rest.  Also, instead of using ribbon, I used hemp twine & used a punched circle with a brad to wrap it around.  

The folded panel is perfect for using a tall stamp.  Since I have many of the Prima mixed media doll stamps, I thought they would work great.  
School started on Tuesday, so I made the girly girl card for the neighbor girl across the street.  And her brother, who plays all kinds of sports, got a super jock card.  
Thanks so much for taking time to stop by. 

Monday, July 27, 2015

cathedral windows

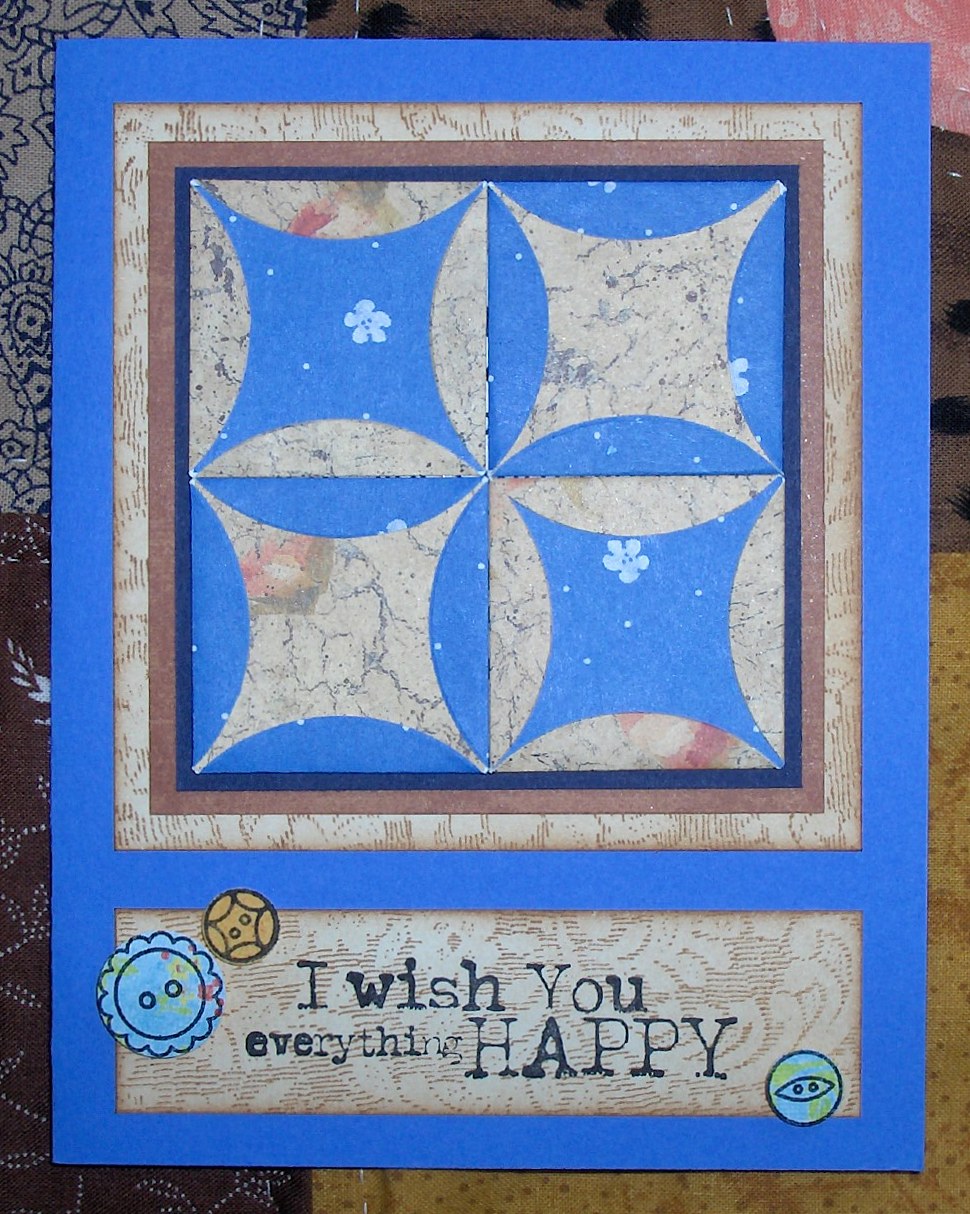
Hi friends.  Today the SCS technique challenge was cathedral windows -- not in a building, but in a quilt.  Since I love quilting, I wanted to participate. 

The instructions given used a 1-3/8" circle punch, but I was having trouble with mine, as well as having issues with the folding.  So I chose to go with a 2" circle die instead.  It was so much easier to work with.  Originally I was going to make it really scrappy, but I ended up just using two different pattern papers for the quilt design. 

For one of the layers underneath, I couldn't find a paper that matched to my satisfaction, so I made my own using a victorian lace background stamp and creamy caramel ink.  I also sponged over the design to change the color of the cardstock. 

The sentiment is from Red Lead and the buttons are stamped & punched. 

Thanks for stopping by.

Saturday, March 29, 2014

neglected

Yes, I've really been neglecting my blog.  I can't believe it's been over a month since my last post.  I suppose that is mostly because I haven't really been creating much.  Not that I haven't done any crafting, because I have.  I made cards for my classes, I've been doing a bit of crochet, and I started quilting another one of those quilts that have been sitting for a couple of years waiting for me to stick a needle in. 

Here are two of the cards from my last class.  The first one is called a double dutch fold

I used the SU hostess set simply sketched and colored the image with a waterbrush and intense pencils.  I love those and really need to get the big set of 72.  I only have 24 and it always seems like the color I really need isn't there.  I guess I need to save some money so I can get those. 

The second card is a whitewashing technique -- so fun.  You embossed the image in white EP and then color it with white ink and a waterbrush.  I chose to leave mine neutral and not add any additional color. 

And I have another card that I made for today's inspiration challenge on SCS.  I chose the 2nd sample given as my inspiration.  I used a new background stamp from SU called hardwood -- awesome stamp. 

I have something else I worked on this week, but I'll save that for another post. 

Thanks so much for stopping by. 

Thursday, January 16, 2014

faux washi tape

Hi friends.  Today's technique challenge on SCS was to use tape. 

I like the look of washi tape, but don't have very much.  Since I have no blue, and that's what I wanted to go with my card, I made my own washi tape using scor-tape and a coffee filter.  I filled one side of the filter with the scor-tape.  Then I used several different blue distress stains to color the filter.  After drying it with my heat gun, I cut apart the strips of tape and then stamped some patterns on some of the strips, using ribbon stripes from Gina K Designs.  The one real disadvantage of this faux washi tape is that it is permanent; you can't lift it off and move it like regular washi tape.  The coffee filter is also less transparent than regular washi tape. 

I inked the background (leaf & floral - hero arts) with bashful blue & misted lightly with water before stamping. 

The main image is from don't worry (our daily bread designs).  I used inktense pencils and a water brush to color it. 

Thanks so much for stopping by. 

Tuesday, January 14, 2014

spirelli window

Hi friends.  When I saw yesterday's technique challenge on SCS - to put some real stitching on your card, I knew I wanted to play along. 

I think spirelli is such a beautiful technique, that I decided to make a spirelli circle that was actually a window on the card front.  I was going to make it a single layer card, but then realized that the not so pretty back of the stitching would show on the inside of the card, so I made a separate layer, with an opening behind the spirelli to make a window card and the image on the inside of the card. 

It's not really blurry; the thread shadows just make it look that way.  Stamps are SU simply sketched, stamped in black stazon and colored with red and green markers. 

Thanks so much for stopping by. 

Monday, October 21, 2013

hope you can cling to days 20 and 21

Hi friends.  I was playing a little catch up today, since I didn't do any stamping yesterday.  So here are my latest cards for the breast cancer awareness challenges on SCS. 

Challenge twenty-three -- kindness is showing support.  Create a card using the KISS technique.

I inked hello doily (SU) with elegant eggplant ink, and then I inked the butterfly with sage shadow and kissed (pressed) them together before stamping the butterfly on white card stock.  I repeated the same steps for the second butterfly.  The butterfly bodies are die cut with a memory box die. 

I glued some strips of sage shadow and elegant eggplant on an ivory card base.  The sentiment is from take flight (gina k).  I sponged the edges of the card with eggplant ink and popped up the wings on the butterflies with foam tape. 

Challenge twenty-four -- The King of Rock n Roll.  Create a card inspired in some way by Elvis. 

I went with the song 'blue suede shoes' and used a piece of blue suede paper.  The card base is more mustard and the DP is pink paislee.  The flowers (judith) are stamped with pacific point ink (I had some extras stamped from a few days ago).  I used copic markers to color them.  I punched a bunch of leaves from old olive card stock using a martha stewart punch.  Then I sponged the edges with old olive and added vein lines with a marker.  I punched out some tiny circles from the DP to use as faux brads.  The sentiment is from sincere salutations (SU).  I really love the color combination on this card. 

My third card is for the technique challenge (Inlay Die Cuts) on SCS.   The technique was to cut small strips of pattern paper or card stock and glue them to another piece of paper and then die cut a shape from the new paper you made.  This is a good technique to use up some small scraps of pattern paper. 

I die cut a scalloped circle and then drew around it with a black sharpie.  The flower die is called honeyblossom sprig from memory box.  This was my first time using it, and I really like it.  The sentiment is from friendship blooms (SU). 

Thank you so much for stopping by.  I hope your week is off to a great start. 

Saturday, June 1, 2013

sending smiles

Hi friends.  I hope you are enjoying your weekend.  I haven't done much creating lately.  Earlier in the week, I played a little bit with my new gelli plate, which my honey gave me for our anniversary.  What fun, but I didn't get to play very long.  I can see where this would be lots of fun to do with a group.  Anyway, today I took one of the pieces I had made with the gelli plate and added some more to it with stencils and paint.  Then I cut it up into card sized pieces.  I used one on my card. 

I wanted to make a card for a challenge on the Outlaw Women Artists Emporium facebook page, things that make you smile.  Since butterflies make me smile, I pulled out one of my favorite old SU stamp sets, wonderful wings, and stamped the butterfly on the background and a second time on a piece of white card stock.  I colored the second one with ink and a sponge and then cut it out.  I attached the body to the card directly over the first butterfly, and added some dimensional tape under the wings. 

I added a trail with faux stitching, some thin strips of black card stock and some dots with a black Pitt pen, so that it also fit the technique challenge on SCS to do some crazy stitzhing. 

The sentiment is from Hero Arts. 

Thanks so much for stopping by. 

Saturday, March 30, 2013

sepia

Hi friends.  I hope you are having a great weekend.  Today I spent way too much time (overthinking) making a card for the inspiration challenge and the technique lovers challenge on SCS, but I'm finally finished.  For my inspiration, I used this gorgeous sealing wax stamp, which I think is probably ivory, but I can't read Chinese! 

I decided to use sepia technique, which is super simple.  I used ivory card stock and vintage photo distress ink for all the layers.  I stamped a PSX delphiniums stamp on a mini baroque die cut (Tim Holtz/Sizzix), and then used my water brush to spread the ink.  I also pulled some ink from the ink pad with the brush to make some areas darker. 

I used two background stamps, dotted diamonds (Rubbernecker) and pretty pattern paper (Cornish Heritage Farms).  Two other dies were used as well - baroque (Tim Holtz/Sizzix) and lacy ovals (Spellbinders). 

All of the layers were sponged with vintage photo and the edged darkened even more using a sponge dauber.  The front layer is raised on dimensional foam tape. 

I'm really happy with how this turned out.  Of course, I'd love to have that sealing wax stamp, too. 

Thanks for stopping by.

Saturday, March 23, 2013

five challenges in one

Hello friends.  Tonight I checked out the inspiration challenge on SCS, and as I looked at the sample inspiration pictures, I realized that I could combine this challenge with some of the others for this week.  The inspiration sample that I chose to work with is a girl in a denim dress.  The other challenges are mix-ability (rip it, paste it, ink it), free for all (geometrically speaking), ways to use it (girls rule), and technique lovers (transform a map). 

I started with a white card base.  I had a photo copy of an old map, so I tore it into strips, inked the edges with vintage photo ink and glued the strips to my card base.  Then I inked over the whole thing with faded jeans ink. 

I traced around the insert from a used tape roll on some denim from an old pair of jeans and then cut out the circles.  I could have used a die and my cuttlebug, but was too lazy to pull them out. 

I chose a lady stamp from Stampendous.  I stamped her on white card stock with jet black archival ink, traced around a small container, and cut that out.  Then I sponged faded jeans all around the circle, just leaving her face uninked. 

The sentiment is from Cornish Heritage Farms.   Both the lady and sentiment circles are popped up on dimensional tape. 

I gave the card a bit of a frame by adding the fancy photo corner punches. 

Thanks for checking in. 

Tuesday, February 12, 2013

sanded embossing

Hello friends.  Seems like it's been forever since I've done any of the challenges on Splitcoaststampers.  There was a time I was doing one every day.  But I guess my priorities have changed, as has my art.  I've been dabbling more in mixed media, so I don't make as many cards.  I'm sure the fact that I have a mega supply of cards also has something to do with it. 

However, since I'm still teaching two card classes a month, there is still a need to make a few.  I decided to make one for my class this week using the technique challenge that was posted on Monday.  The challenge was to dry emboss some pattern paper and then sand over the raised areas. 

I chose a piece of paper from My Mind's Eye, embossed it with my textile embossing folder and then sanded with a sanding block.  I mounted that on moss card stock.  I then punched some 7/8" circles from artichoke card stock and cut them in half before attaching them. 

The focal image is from Hugs & Prayers (Gina K.), stamped on naturals ivory with jet black stazon and die cut with a Spellbinders scallop circle.  I used watercolor pencils and a blender pen to color the image.  The edge of the circle is sponged with artichoke ink and dots are added with a black marker. 

Thanks so much for joining me today for a visit. 

Sunday, August 19, 2012

serendipity

Hello, my friends.  We've been having some wonderful weather here.  Cool in the morning (around 50) and in the low 70's during the day.  This is my kind of weather. 

Today I have an art journal page that I made for a challenge at OWSE Yahoo group.  The technique is serendipity. 

I started with some old book pages, which I covered with gesso.  The idea is to make several backgrounds, using ink, paint, stamps, etc.  So I used a number of brilliance inks to sponge on color, somewhat randomly.  I added quite a bit of stamping, mostly with black archival ink, but I also used some color. 

The next step is to cut up your backgrounds into strips, or squares, or other shapes that you can fit back together on your page, but randomly, so that the pieces are all mixed up, making a completely new background.  I cut mine into 1"x3" pieces and then placed them down in a pattern like a quilt.  Now I like color, but I thought my page was way too bright, so I went over it with a gesso wash, toning down the brightness more to my liking. 

I wanted to add something very subtle to bring it all together, so I took a Dylusions stencil and sponged on turquoise ink, and used a black marker to add some highlights.  Using a different part of the same stencil, I sponged black paint over the leaves for a bold accent to balance out the oval frame on the main image.

For my main image, I colored a Penny Black flower with markers, huffed on it and stamped it on white card stock twice.  I then die cut that with a mega ovals spellbinders die in my cuttlebug.  I also cut a black scallop oval to frame it.  I sponged the edge with vintage photo distress ink. 

At the moment, I waiting for a new computer to arrive, so I'll have printer access again.  In the mean time, I found a sentiment that I had printed previously that I thought would work well on this page.  Serendipity?

Thanks so much for stopping by today.  Have a wonderful week. 

Tuesday, March 6, 2012

technique challenge

Hello, my friends.  Lots of snow melted today in our 60 degree weather.  I think Spring must be on the way.

Today I have a card that I made for the technique challenge on SCS, which I'll also be using in one of my classes.  The technique was to stamp an image using only one color of ink.  This bird from Layers of Color was perfect for that technique.  Then I die cut it with one of my new framelits dies from SU. 

The strip on the background is a fun technique using drywall tape. 

Thanks for stopping by.  I hope you are having a great week. 

Tuesday, February 21, 2012

tapestry

Hello again, my friends.  Since tonight is the deadline for finishing the challenges from our slumber party at OWSE Yahoo group, I needed to get this one done.  The technique is called tapestry and a tutorial can be found here on SCS.

I started by inking my white card stock with colorbox pigment inks from a petal point ink pad.  I used direct to paper rather than sponging, since the ink pads are sponge and that was quicker.

The next step is to stamp your image(s) (I used ferns - SU) in white pigment ink (I used SU white craft ink).  Then coat with clear embossing powder and heat.  I then put a coat of versamark ink on and another layer of clear embossing powder.  I'm really happy with how it turned out.  The last time I tried this technique, it didn't work at all.  Maybe using direct to paper put more ink down and gave a better surface for the embossing powder.  I layered this piece with black and then a ballet blue card base. 

I die cut a mini label (Tim Holtz/Sizzix) and stamped my sentiment (Hero Arts) and then sponged the edge with ballet & brilliant blue ink.  I attached the sentiment with dimensional tape over a strip of black card stock.  Had to do that twice, since the first time I had it on the card upside down - oops!   It came off the heavy layer of embossing pretty easily, so it was an easy fix.

I took the photo without flash, so you can't see how shiny the background is.

Thank you so much for stopping by.

Sunday, February 12, 2012

happy valentine's day

Well, almost.  Hi my friends.  I'm still working on the challenges for the first half of February at OWSE yahoo group.  This one is for a valentine using a vintage image.  When I saw the technique challenge on SCS for tomorrow, I decided to combine the challenges.  I'm also entering this in the February challenge for Inspiration Journal, which is to put a heart on it.

The background is made with wrinkle free distress technique using victorian velvet and tea dye distress inks.  I also crumbled the card stock and added some tea dye ink to highlight the wrinkles.  The edges are distressed and sponged with tea dye ink. 

The digital image is die cut using spellbinders classic ovals and the layer of designer paper behind it using big scallop ovals.

The lace edging is hand crocheted.  All the little hearts are punched from the same paper that is behind the image. 

Thanks so much for stopping by.

Wednesday, November 9, 2011

a new use for something old

Hi my friends.  Today was a cold windy, rainy and SNOWY day.  Yes, you read that right.  For quite a while today, we had flakes coming down.  I'm just glad it was still warm enough that nothing accumulated.  I'm not quite ready for winter yet.

Maybe that's why the card I made is nice and summery.  Back in March there was a technique challenge on SCS to make a trellis card.  At the time, I didn't get a chance to participate.  But today, I finally made one.  This card is also for this month's challenge at Inspiration Emporium showcasing our favorite tools.  Without a doubt, I'd have to say my favorite tool is my cuttlebug.  I used it for both cutting and embossing on this card. 

The trellis instructions call for cutting 1/8" strips of paper, but I decided that since I have bin full of quilling paper strips in the basement from many, many years ago, those strips would be perfect and I wouldn't have to cut any.  And I was right - they were just what I needed.

The stamps are SU - wings of friendship and always in my thoughts.  I used a new embossing folder from a set of four called paper lace II.  The designer paper is from Indian Summer stack from JoAnn's.

This will be one of my class cards for next week, so I'm not going to go into detail on how it was made.

Thanks so much for visiting today.

Wednesday, September 28, 2011

more recycling

Hello, my friends.  Even when I was a child, my family was recycling and reusing things, so it is just a continuation for me to do it today when it's the 'in thing' to be 'green'. 

The background on my card is actually a piece of junk mail.  I used pool and purple twilight paint dabbers to color over the entire surface.  When that was dry, I lightly brushed on some gesso.  I found this trash to treasure technique here

The flower, which is colored with markers, was in my stash already cut out.  I thought it would look nice with the background, but I was really stuck on how to finish off the card. 

I finally decided to use a ribbon punch (SU) to add some extra color (cool caribbean, sponged with turquoise, & elegant eggplant, sponged with elegant eggplant). 

The sentiment is stamped with black pigment ink and clear embossed. 

For a bit of sparkle, I rubbed diamond stickles on both the flower center and the card stock strips. 

Tuesday, August 23, 2011

a fun technique

Hi my friends.  Today's technique challenge on SCS was to CASE the first card we had added to our favorites gallery.   Here is the card I copied.  It included a technique that I was unfamiliar with called brazen brilliance, so I did a Google search to find instructions.  Here are two links. One is a blog entry and the other is a .pdf file

Since I don't like to just copy someone else's card, I did make a few changes.  The first change was a new color scheme.  I started with a piece of glossy white paper and stamped a background image (filigree - SU) in pearlescent sky blue brilliance ink and then dried it with my heat gun.  The next step was to use a stipple brush to add color to the background.  I also stamped some images from petal prints (SU).  My main image is also from that set. 

The corner punch hadn't been used in so long, I needed to dust it off. 

I also added some ribbon and pearls, and popped up the main image panel on dimensional tape.  This was a fun technique.  I like how the background just glows.

Thanks for sharing a little piece of my day.

Monday, August 15, 2011

Is it snowing?

Hello, my friends.  We've had a few days with some cooler temperatures, but no - not snowing.  I did, however, make a snowman today.


The technique challenge on SCS today was telescoping cards.  When I taught this technique last month, I knew I was going to have to make a snowman and today's challenge was the perfect opportunity.

I started by die cutting three circles of different sizes from white card stock.  I sponged the edges with cool caribbean and bashful blue ink.  (The photo makes it look a lot brighter than it actually is.)

I cut the hat, nose, and scarf freehand.  I decided to leave off any stick arms, so there would not be a problem with them catching as the card was opened or closed.  I used several small punches for the accents

The circles are connected togther with brads.  I really liked how it turned out and it was fun to make. 

Thanks so much for stopping by today.  I hope you all have a wonderful weeks.