Hi friends. I taught my cuttlebug class today. We had a lot of fun. I will post pictures of the cards, but I haven't yet taken photos, so that will have to wait. I do, however, have a picture of the card I entered in the contest for the Rubber Stamp Event on Saturday in West Bend, Wisconsin.
The category of Saturday's contest is Cinderella, so I pulled out one of my newest Prima mixed media doll stamps, Aurora, and used her on my card. Now Aurora is one of the largest doll stamps by Julie Nutting, so I knew that she was not going to completely fit on the card, which had to be an A2 size. So I made made some adjustments.
I stamped her a few times on different papers and did some paper piecing. The background and both papers used on her dress are from the same paper stack, which was a birthday gift from my daughter.
I colored her hair with markers and then added some gold glitter on her crown and on her gown.
The sentiment is from My Sentiments Exactly. On the inside, it reads, 'dream big'.
If you happen to be at the stamp show on Saturday, I would appreciate if you would vote for my card.
Thank you so much for stopping by.
Showing posts with label paper piecing. Show all posts
Thursday, July 10, 2014
Saturday, August 24, 2013
word play - F
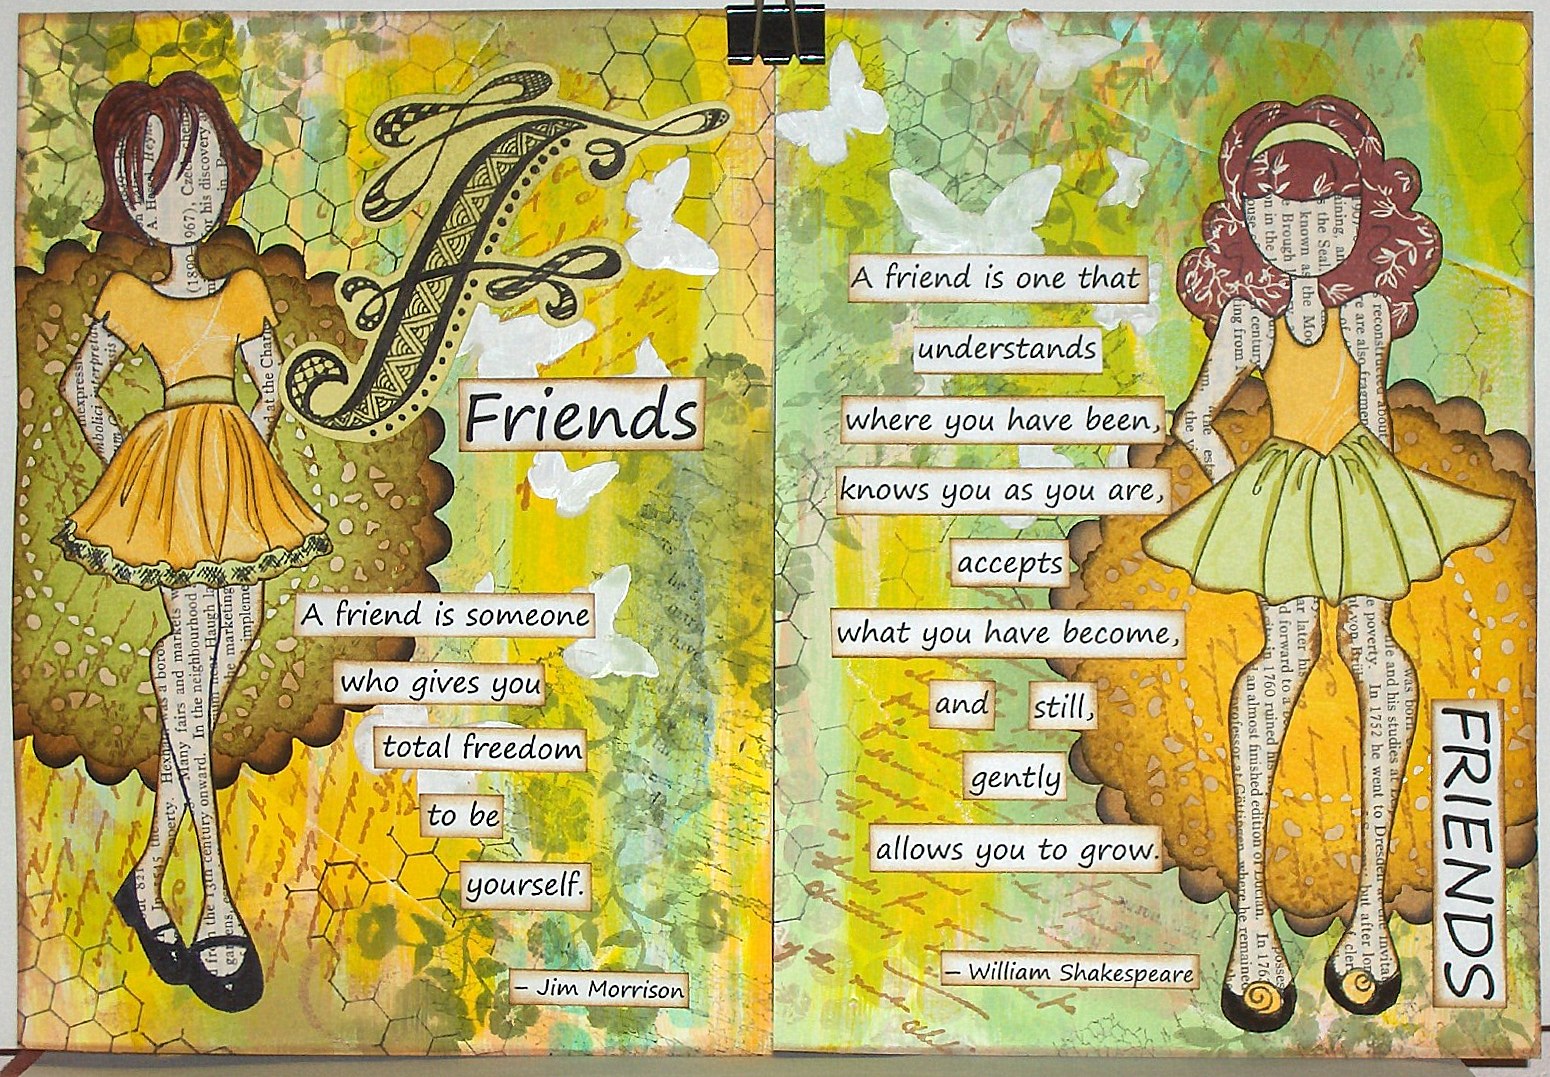
Hi friends. Another spread in my word play journal. I told my daughter that this was my 'F' word, and she just snickered. But no bad language here. My word for the letter F is friends. You can find all the completed pages here.
I wanted to make something for the weekly challenge on the OWSE facebook page, I decided to to make another spread for this journal. There were some choices for colors, and I chose green and yellow. This is really not one of my favorite color combinations, but I guess I need to step out of my box once in awhile.
Although the background of the pages was done previously, I added more color with both paint and ink. Then I did a bunch of stamping and added some texture with modeling paste and a butterfly stencil (Red Lead). In a couple of places, the ink underneath bled through the modeling paste, so I went over that with white acrylic paint. It didn't completely cover, but I thought it wasn't too noticeable, since the background is pretty busy anyway, and I was going to cover up a lot of it with the dolls and the words.
I used two of my new Prima mixed media dolls by Julie Nutting. I have a hard time remembering the names. I first glued a page from an old encyclopedia onto a piece of this card stock and then stamped the dolls on that and cut them out. I paper pieced the clothes and the hair on one.
Behind the dolls are die cuts of a French pastry doily die (Cheery Lynn Designs) and a Sizzix scalloped circle.
The words were printed on my computer and cut out. The edges on everything are sponged with vintage photo distress ink. The letter F is done with zentangles or zendoodles, whichever you want to call it.
Thanks so much for stopping by.
I wanted to make something for the weekly challenge on the OWSE facebook page, I decided to to make another spread for this journal. There were some choices for colors, and I chose green and yellow. This is really not one of my favorite color combinations, but I guess I need to step out of my box once in awhile.
Although the background of the pages was done previously, I added more color with both paint and ink. Then I did a bunch of stamping and added some texture with modeling paste and a butterfly stencil (Red Lead). In a couple of places, the ink underneath bled through the modeling paste, so I went over that with white acrylic paint. It didn't completely cover, but I thought it wasn't too noticeable, since the background is pretty busy anyway, and I was going to cover up a lot of it with the dolls and the words.
I used two of my new Prima mixed media dolls by Julie Nutting. I have a hard time remembering the names. I first glued a page from an old encyclopedia onto a piece of this card stock and then stamped the dolls on that and cut them out. I paper pieced the clothes and the hair on one.
Behind the dolls are die cuts of a French pastry doily die (Cheery Lynn Designs) and a Sizzix scalloped circle.
The words were printed on my computer and cut out. The edges on everything are sponged with vintage photo distress ink. The letter F is done with zentangles or zendoodles, whichever you want to call it.
Thanks so much for stopping by.

Labels:
acrylic paint,
art journal,
Cheery Lynn Designs,
cuttlebug,
gesso,
OWSE,
paint,
paper dolls,
paper piecing,
Prima,
Sizzix,
stencil,
word play,
zentangle
Wednesday, October 13, 2010
Fall is in the air
Hi, my friends. I am so much loving the fall weather. We've been having chilly nights and temps in the 60's and 70's during the day.
My stamping tends to take on autumn hues this time of year. I can't believe I haven't posted in a week. I didn't stamp over the weekend, but then on Monday, I played catch up on the Hope challenges on SCS. And then yesterday, I did that one, and today, the one for today.
So I guess I'll just give you a bunch of eye candy today. I have cards for challenges on the 10th (walk on by), 11th (happy flowers), 12th (birthdays are a piece of cake), & 13th (don't be a square). I'm not going to give you all the details, but if you are interested in how something is made, just send me an email, and I'll try to answer your questions. Thanks for stopping by. Enjoy.


My stamping tends to take on autumn hues this time of year. I can't believe I haven't posted in a week. I didn't stamp over the weekend, but then on Monday, I played catch up on the Hope challenges on SCS. And then yesterday, I did that one, and today, the one for today.
So I guess I'll just give you a bunch of eye candy today. I have cards for challenges on the 10th (walk on by), 11th (happy flowers), 12th (birthdays are a piece of cake), & 13th (don't be a square). I'm not going to give you all the details, but if you are interested in how something is made, just send me an email, and I'll try to answer your questions. Thanks for stopping by. Enjoy.


Sunday, October 3, 2010
a row of pumpkins
Hi, my friends. This is my 2nd post today. I seldom check the featured stamper challenge on SCS, since the family is home and there is less time to get everything out to stamp, but for some reason, this morning I looked and quickly found this card to case. I changed everything except the layout.
I used a long retired SU background stamp called weathered, which I stamped in crumb cake on cream cardstock. The card base is dusty durango, which I used because it was the best match for the pumpkins.
I pumpkin image is from Autumn Harvest (SU). I pulled out some orange dp (all from a DCWV Indian Summer stack) and stamped one pumpkin on each and then cut them out. I sponged some vintage photo ink on the edges to give them a bit more depth and colored the stems with a green marker. Then I just glued them in a staggered row across the card, tied some copper cord around it and added a tag, using Small Script (SU) and my word window punch.
I love when cards come together so easily.
Thanks for visiting.
I used a long retired SU background stamp called weathered, which I stamped in crumb cake on cream cardstock. The card base is dusty durango, which I used because it was the best match for the pumpkins.I pumpkin image is from Autumn Harvest (SU). I pulled out some orange dp (all from a DCWV Indian Summer stack) and stamped one pumpkin on each and then cut them out. I sponged some vintage photo ink on the edges to give them a bit more depth and colored the stems with a green marker. Then I just glued them in a staggered row across the card, tied some copper cord around it and added a tag, using Small Script (SU) and my word window punch.
I love when cards come together so easily.
Thanks for visiting.
Thursday, June 25, 2009
four challenges - whew!
Hello everyone. Happy am I. I just managed to fit four challenges into one card. AND it didn't take me all day either. The challenges are inspiration, color, sketch, and ways to use it on SCS this week.
What really made this easy is that there were certain parameters from each challenge that just meshed together. A blue bird for the inspiration, which fit the sketch and the colors nicely and the colors already worked for the ways to use it, which was bold and bright.
I used my new hostess set wings of friendship, did a little bit of paper piecing, some cuttlebug embossing, added a crochet flower, button and some pearls.
The deets:
stamps: wings of friendship (SU)
ink: pacific point, tangerine tango, summer sun
paper: pacific point, tangerine tango, summer sun, whisper white
other: cuttlebug, cb textile embossing folder, nestabilities labels one die, corner rounder, sponge dauber, crochet flower, button, half pearls, foam tape
Thanks for stopping by. Have a blessed day.
What really made this easy is that there were certain parameters from each challenge that just meshed together. A blue bird for the inspiration, which fit the sketch and the colors nicely and the colors already worked for the ways to use it, which was bold and bright.
I used my new hostess set wings of friendship, did a little bit of paper piecing, some cuttlebug embossing, added a crochet flower, button and some pearls.The deets:
stamps: wings of friendship (SU)
ink: pacific point, tangerine tango, summer sun
paper: pacific point, tangerine tango, summer sun, whisper white
other: cuttlebug, cb textile embossing folder, nestabilities labels one die, corner rounder, sponge dauber, crochet flower, button, half pearls, foam tape
Thanks for stopping by. Have a blessed day.
Sunday, April 13, 2008
I didn't do any stamping today, except for designing a card for an upcoming class, but I don't have it finished yet. So I thought I'd show you a few of the cards I made for last weekend's VSN. If you want more details on the challenges, check out this link.
In order as you see them, the cards are: challenge A, B, F
& E. E
njoy! Thanks for stopping by.
In order as you see them, the cards are: challenge A, B, F
& E. E
njoy! Thanks for stopping by.
Saturday, April 12, 2008
inspired by a cow
If you're expecting to see a cow, I hope you aren't too disappointed. Well........., if you really want to see one, check out today's inspiration challenge on splitcoast. And if you follow the link to the website, there are many more. Some very interesting pieces of artwork. I was so overwhelmed by so many choices that I decided to simply use the one that was posted as my source of inspiration. The swirly turquoise dress is what inspired this card.
I stamped the girl in adirondack pitch black ink on white mat coat card stock and also stamped it again on turquoise card stock. I used my copic markers to color the girl and cut out the dress and glued it over the white one. Then I added pink glitter gel pen to highlight the dress. The glitterly brads started out plain and drab. I sanded them, dipped them in positively pink craft ink and then in iridescent ice embossing powder and heated them. The pink scalloped layer was made using a slit punch. Dots of glitter gel pen were added to the scallops and the front piece. I didn't know what I wanted to do with the right side of the card, so I finally decided to stamp some swirls from baroque motifs.
Supplies:
stamps: baroque motifs (SU), girl (Stamp Oasis/Rubbernecker)
ink: positively pink craft (retired SU), adirondack pitch black, copic markers
paper: tempting turquoise, pixie pink, basic black, white mat coat
other: brads, iridescent ice ep, heat tool, stardust glitter gel pen, slit punch
I'm so glad you stopped by.
I stamped the girl in adirondack pitch black ink on white mat coat card stock and also stamped it again on turquoise card stock. I used my copic markers to color the girl and cut out the dress and glued it over the white one. Then I added pink glitter gel pen to highlight the dress. The glitterly brads started out plain and drab. I sanded them, dipped them in positively pink craft ink and then in iridescent ice embossing powder and heated them. The pink scalloped layer was made using a slit punch. Dots of glitter gel pen were added to the scallops and the front piece. I didn't know what I wanted to do with the right side of the card, so I finally decided to stamp some swirls from baroque motifs.Supplies:
stamps: baroque motifs (SU), girl (Stamp Oasis/Rubbernecker)
ink: positively pink craft (retired SU), adirondack pitch black, copic markers
paper: tempting turquoise, pixie pink, basic black, white mat coat
other: brads, iridescent ice ep, heat tool, stardust glitter gel pen, slit punch
I'm so glad you stopped by.
Labels:
card creations,
Copic Markers,
paper piecing,
Rubbernecker
Subscribe to:
Posts (Atom)